ID : 856
Transporting the Robot Unit
1
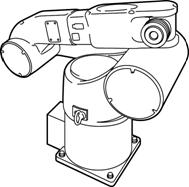
Before transportation, set the robot in a transport position as shown at below by manually moving the second, third and fourth axes.
When unpacked first, the robot is in the transport position, so this job is not required.
- VM6083/VM60B1

- Transport Position
| Axis | Angle |
|---|---|
| First axis (J1) | 0° |
| Second axis (J2) | -90° |
| Third axis (J3) | +165° |
| Fourth axis (J4) | +90° or -90° |
| Fifth axis (J5) | +90° or -90° |
2
Disconnect the robot control cable, air piping and user signal cables from the robot unit.
When the robot unit is first unpacked, this job is not required.
3
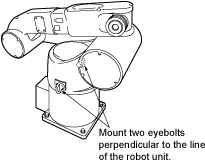
As shown at right, mount the eyebolts.
When delivered, the robot unit is packed with eyebolts attached, so this job is not required.
-
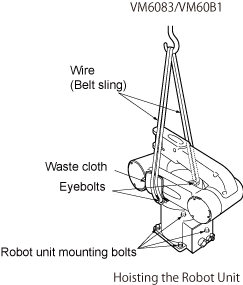
VM6083/VM60B1

Mounting Eyebolts
4
As shown at right, place a waste cloth on the second arm and pass the wire through the two eyebolts.

5
Worker A: Remove the four bolts while supporting the robot unit to prevent it from getting overturned.
6
Worker B: Operate the crane and move the robot unit to the target site.
7
Worker B: Put the robot unit down in the target position.
Worker A: Temporarily secure the robot unit with four bolts.
8
Secure the robot unit according to the instructions in "Securing the Robot Unit" on the next page.
9
Remove the eyebolts from the robot unit.
- Before transporting the robot, check that the path to the target position is free of obstacles.
- Before running the robot unit, be sure to remove the eyebolts. Otherwise, the robot arm will strike against those eyebolts.
ID : 856

