
Displaying and Setting the Arm Auxiliary Functions
Operation path : [F2 Arm] - [F6 Aux]
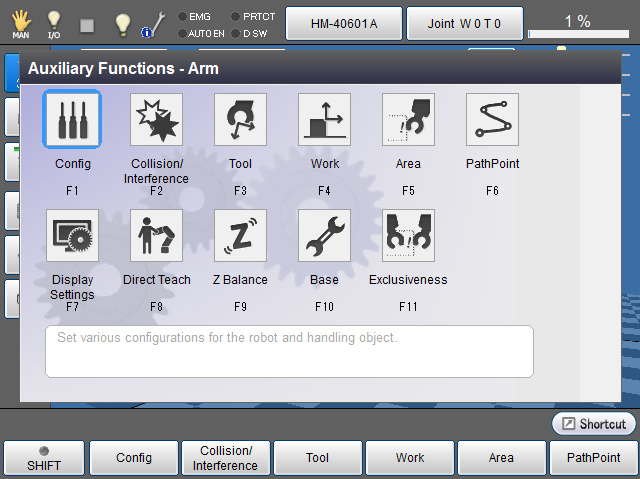
Display the menu to set various configurations required to move robot, "Tool coordinates" and "Work coordinates", and "Area","PathPoint".
Press [F6 Aux] to display the following [Menu] window.
| Available function keys | |
|---|---|
| [F1 Config] |
Displays [Config] window. |
| [F2 Collision Detection] |
Display [Collision detection setting] window. Set [Collision Detection Function]. |
| [F3 Tool] |
Display [Define Tool Coordinate] window. |
| [F4 Work] |
Display [Define Work Coordinate] window. |
| [F5 Area] |
Display [Define Area] window. |
| [F6 PathPoint] |
[PathPoint] window appears. Set path points. |
| [F7 Display Settings] | Set the display item of [Arm] screen. |
| [F8 Direct Teach] |
Displays [Direct Teach] window. Switch to the direct teach mode. To start the Direct Teach, release the brake then press [OK] of the teach pendant. |
| [F9 Z Balance] | Display [Z Balance] window. The gauge moves in response to the air pressure. Adjust the air pressure until the adjustment completion message appears. |
| [F10 Base] | Display [Base setting] window.(Ver.1.9.*or higher) |
| [F11 Exclusiveness] | Display [Exclusiveness] window.(Ver.1.12.*or higher) Enable/Disable the exclusive area and configure the exclusive monitoring and exclusive communication. |
- If you start the direct teach mode before Z axis air balance adjustment is done, [Z balance] window will be displayed. In this case, adjust the Z axis air balance.
- If the Z axis air balance adjustment is not completed, the arm might fall off.