ID : 4627
Transporting the Floor-Mount Type
This section gives the typical installation procedure assuming that you have set up the robot mount bed and prepared robot mounting bolt holes in it. If you have not done it yet, first read "Securing the Robot Unit".
- The installation jobs should be handled by at least two persons. Robot unit weight: Approx. 56 kg (124 lbs)
- Be sure to put on a helmet, safety shoes, and gloves.
- Les travaux d'installation doivent être réalisés par deux personnes au moins.
Poids du robot: environ 56 kg (124 lbs) - Porter un casque, des chaussures de sécurité et des gants.
1
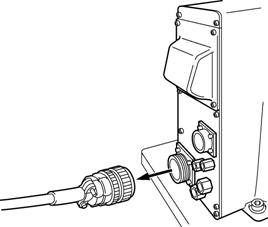
Disconnect the motor cable, encoder cable, air pipes, hand, and tools from the robot unit, if mounted.

(HS illustration tentatively used)
[Disconnect the motor cable, encoder cable, and others.]
2
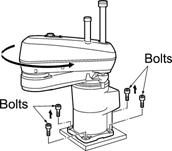
Turn the 2nd axis until it comes into contact with the mechanical end in order to keep the safe position. Then remove the four bolts and release the robot unit from the pallet.
When worker A is removing those bolts, worker B should support the 1st-axis arm to prevent the robot unit from overturning.
Lorsque le travailleur A retire les boulons, le travailleur B doit soutenir le premier bras à axe pour éviter que le robot ne se retourne.

3
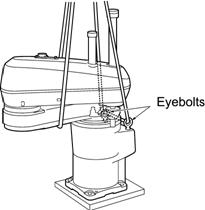
Transport the robot unit to the mounting position using the crane and eyebolts.
- Since the robot unit weighs approx. 56 kg (124 lbs), prepare a crane and forklift with a hoisting load of 0.2 ton or more.
- The mounting job must be handled by at least two persons including a qualified operator for sling, crane and forklift operation.
- Be sure to put on a helmet, safety shoes, and gloves.
- After the mounting job, remove the eyebolts from the robot unit and store them.
- Étant donné que le robot pèse environ 56 kg (124 lbs), préparer une grue et un chariot élévateur à fourche pour une charge de 0,2 tonne minimum.
- Le montage doit être réalisé par deux personnes au moins, dont un opérateur qualifié pour la manipulation d'une élingue, d'une grue et d'un chariot élévateur à fourche.
- Porter un casque, des chaussures de sécurité et des gants.
- Après le montage, retirer les boulons à œil du robot et les ranger.

4
Put the robot unit on the mount bed and secure it with four bolts temporarily.
5
Fix the robot unit, referring to"Securing the Robot Unit".
Tightening torque: 128 ±20 Nm (For HM series)
ID : 4627

