
Setting Tool Coordinates by Easy Teaching
Operation path : [F2 Arm] - [F6 Aux] - [F3 Tool] - [F4 Easy Edit]
Teach robot several points to register in the position coordinates (P type variable). Then, set the tool coordinates using data of the registered position coordinates.
For the 6-axis robot, you need to enter Rx, Ry, and Rz manually, whereas the X, Y, and Z are calculated automatically. For the 4-axis robot, you need to enter Z, and Rz manually, whereas the X and Y are calculated automatically.
Press [F4 Easy Edit] to display the following [Tool coordinate setup by teaching * points] window.(The example of teaching 4 points are given in the figure.)
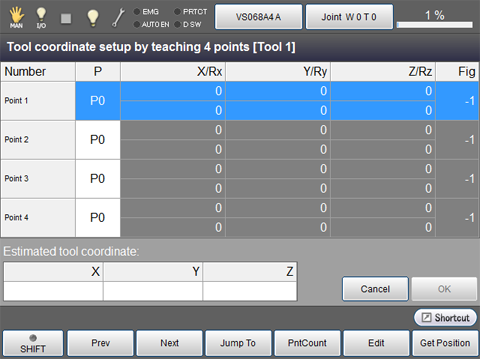
Confirm the value of "estimated tool coordinate" when all P type variables are registered. Then press [OK] to reflect the resulting coordinate in the tool coordinate number 1. If the "estimated tool coordinate" cannot be calculated, [OK] button is disabled.
| Available function keys | |
|---|---|
| [F1 Prev] | Move to the previous page of the currently displayed registered point number. |
| [F2 Next] | Move to the next page of the currently displayed registered point number. |
| [F3 Jump To] |
Display ten key. Enter the registered point number to display with ten key, and press [OK] to display the registered point of the specified number. |
| [F4 PntCount] |
Change the number of teaching points used for setting the tool coordinates. Ten key will be displayed. Enter the point number to display with ten key, and press [OK] to change the teaching point number. The settable teaching point number is from 3 to 10. |
| [F5 Edit] |
Display ten key. Enter the P type variable number to register, and press [OK] on the ten key to register the coordinates of the registered P type variable. |
| [F6 Get Position] |
Load a current position into a position coordinate (P type variable). Choose desired number and position coordinate(P type variable) and then press [OK] to load the current position. |