
ID : 10342
Setting Method by WINCAPSIII
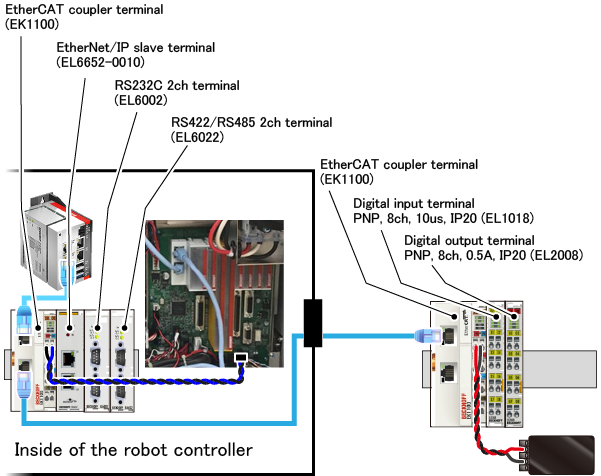
Using digital I/O extension terminal
If you use the digital I/O extension terminal (either of the digital input terminal, the digital output terminal, the digital input/output terminal), you need to set the connection configuration in [RC9 DIO setting].
The following configuration is explained as an example.
1
- Select [RC9 DIO setting] from the [Project] menu.
- Select the check box of [Use DIO modules] on the [DIO setting] window.
- Click the cell just under "IPC(RC9)" of "Module configuration" pane. In this cell, enter the I/O module directly connected to the robot control IPC.
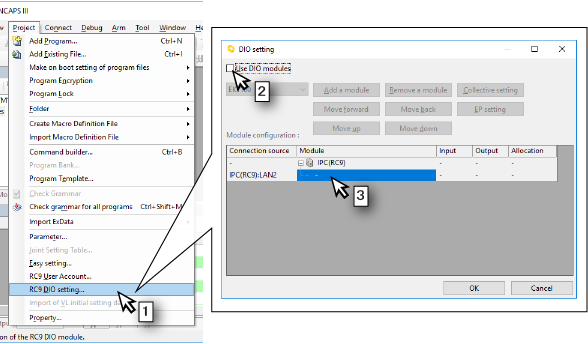
2
- I/O module directly connected to the robot control IPC is the EK1100. Select "EK1100" from [I/O option selection list box].
- Click the [Add a module] button.
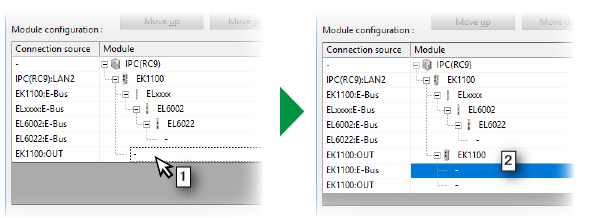
- The EK1100 is added. For the I/O module connected to the EK1100, enter it under the EK1100.

3
For the field network slave terminal, select "ELxxxx" from [I/O option selection list box] and add to the module configuration. The following figure shows a state that the EL6652-0010(ELxxxx), EL6002, EL6022 have been added. This completes the configuration inside of the robot controller.

4
The EK1100 outside of the robot controller is connected to the EtharCAT signal output connector of the EK1100 inside of the robot controller. In this case, add the EK1100 outside of the robot controller to "EK1100:OUT" in "Module configuration" pane.
- Select the cell of "EK1100:OUT".
- Select “EK1100” from [I/O option selection list box] and click the [Add a module] button.
5
Add the EL1018 and EL2008 to the EK1100 outside of the robot controller. For the digital input terminal and the digital output terminal, "Not use" is displayed in "Allocation" column as below.
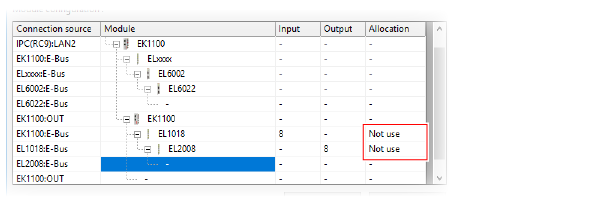
6
For the digital input terminal and the digital output terminal (hereafter, "digital terminal"), you need to set the allocation of port numbers.
- Double-click "Not use" and select the range of port numbers to be allocated.
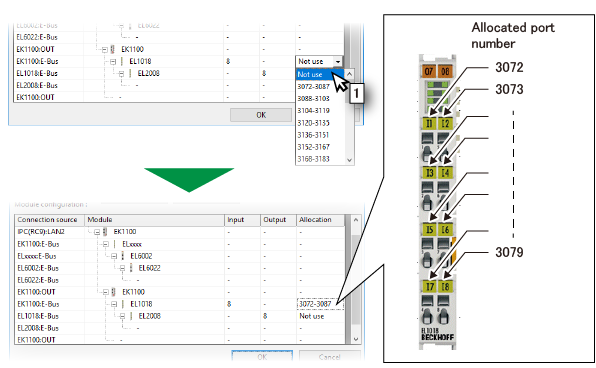
In the above figure, the range of 3072 to 3087 is allocated for the EL1018. Port numbers are allocated from the lowest number of the terminal numbers of the digital terminal. Therefore, in the above figure, 3072 is allocated for the terminal I1, 3079 is allocated for the terminal I8 of the EL1018.
The range of port numbers are separated by every 16 points. If eight digital terminals are allocated to the range, other eight port numbers left in the range cannot be used. In the above figure, port numbers 3080 to 3087 cannot be used.
7
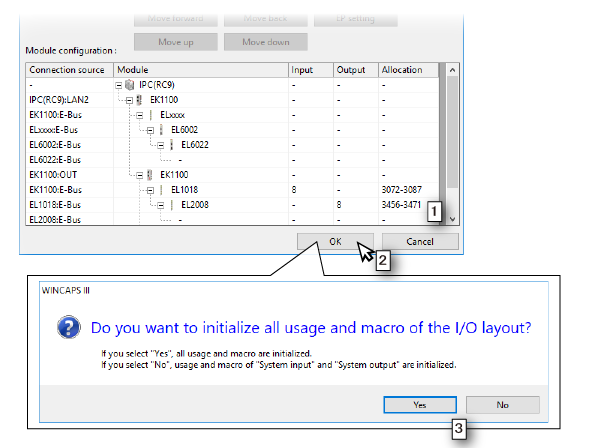
- Set the allocation of port numbers for the EL2008. This completes all connection configuration.
- Click the [OK] button on the [DIO setting] window.
- The window for selecting whether to initialize the I/O allocation will appear. Click either [Yes] or [No].
8
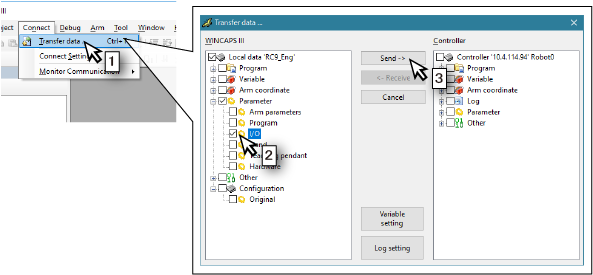
Send your setting data to the robot controller.
- Select [Transfer data] from the [Connect] menu.
- Open [Parameter] in the [WINCAPSIII] pane and select the check box of [I/O].
- Click the [Send] button.
9
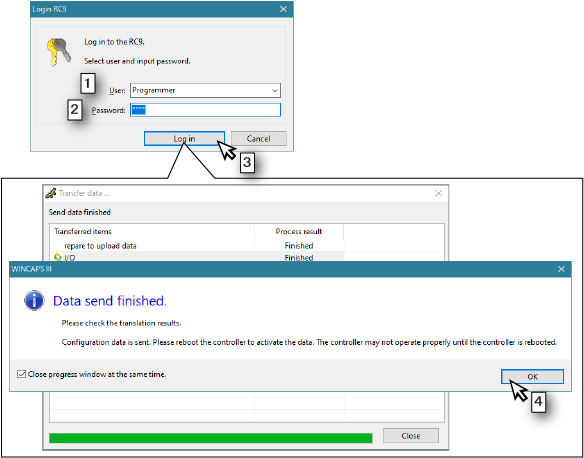
- The [Login RC9] window will appear. Select the user accounts of user level "Programmer" or higher among users set in the robot controller.
- Enter a password.
- Click the [Log in] button.
- When the window that finished sending data is displayed, click the [OK] button.
- Reboot the power of the robot controller.
This completes the setting.
ID : 10342