
ID : 10548
Connecting the AC Power Cable
The AC power cable for RC9M is available in two types: the new model and the old model. The shape of their connectors and the color of the electric wires inside the cables are different between the new model and the old model. Their specifications and connection procedure are not different. For details, see the following "New Model and Old Model AC Power Cables".
Ensure the bending radius (internal) of the AC power cable is 114 mm or more. The cable may be broken if bent excessively.
1
Set the power switch of the robot controller to "Power-off".
For information about the status of power-on/off, refer to "Turning the Robot Controller ON/OFF".
2
Insert the AC power cable connector to the AC power connector of the robot controller. When you insert the cable, match the projected part of the AC power connector and the cutout of the connector of the AC power cable.

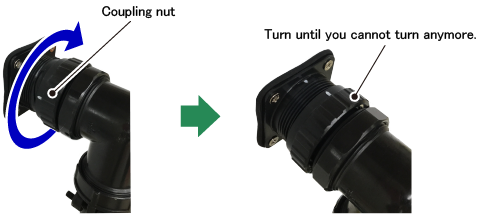
3
Turn the coupling nut of the AC power cable to the right as you face the robot controller. Turn the nut until it cannot be turned anymore. This will lock the connector.
If the connector is not locked, the robot may fail to work properly due to contact failure.
New Model and Old Model AC Power Cables
Shape of the Connector
| New Model |
|
|---|---|
| Old Model | 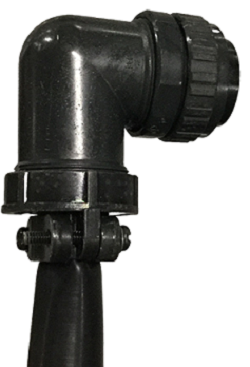 |

Wire Color
See the label attached to the end of the AC power cable to check the color of the wires inside the cable.
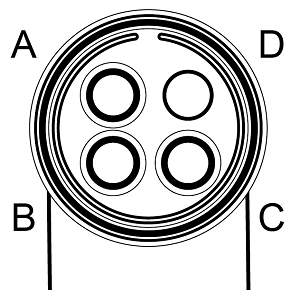
| A | B | C | D | Label | |
|---|---|---|---|---|---|
| New Model | Black/1 | Black/2 | Black/3 | Green/Yellow | 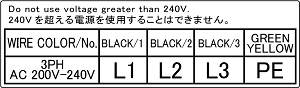 |
| Old Model | Red | White | Black | Green/Yellow | 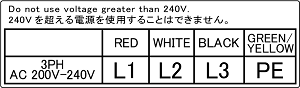 |
All the three wires of the new model cable are black and numbers are printed on their sheath as shown below.

ID : 10548