
ID : 10565
How to Pull Out Cables
1
With a Phillips screwdriver, remove two screws on the upper part of the I/O cable cover.
After that, remove the I/O cable cover from the robot controller.

2
Among two of cable multi-outlet plates, remove four screws on the corner of the left plate with a Phillips screwdriver.
After that, remove the cable multi-outlet plate from the robot controller.
If an additional hole to pass a cable is needed, purchase an optional multi-outlet plate and install it to the right cable multi-outlet plate.

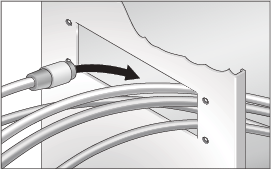
3
Pass all cables you want to pull out through the rectangle hole where the cable multi-outlet plate was placed.
(The orientation of the rectangle hole in the following figure is landscape though, the actual installation is portrait.)
4
From the cable multi-outlet plate, at first, use only the hole plate.
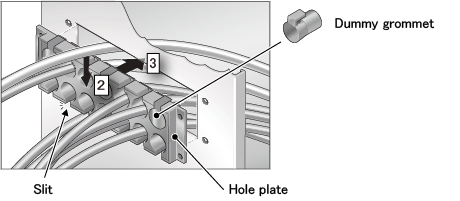
- In the factory default, all of openings on the hole plate are covered with dummy grommets. Remove the grommet from the hole where you want to pass the cable.
- Pass the cable through the slit of the hole plate.
- After you pass all cables through the holes of the hole plate, place the hole plate to the rectangle hole of the robot controller.
5
Catch a cable with a suitable grommet, pass the grommet through the hole of the hole plate.
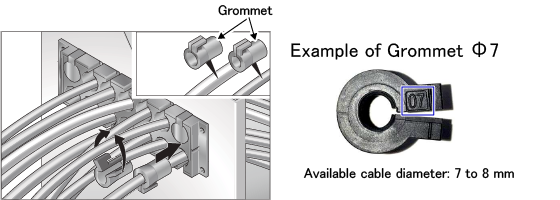
You can check the applicable cable diameter for your grommet by the number on the grommet. For example, if your grommet is "Grommet ⌀7", the number "07" is written as the above figure. In this case, the applicable cable diameter is between 7 to 8mm. The following table shows the correspondence between the number on the grommet and applicable cable diameter.
| No. | Applicable cable diameter | Name |
|---|---|---|
| 04 | 4 to 5 mm | Grommet Small size* 1-hole ⌀4 - 5 |
| 05 | 5 to 6 mm | Grommet Small size* 1-hole ⌀5 - 6 |
| 06 | 6 to 7 mm | Grommet Small size* 1-hole ⌀6 - 7 |
| 07 | 7 to 8 mm | Grommet Small size* 1-hole ⌀7 - 8 |
| 08 | 8 to 9 mm | Grommet Small size* 1-hole ⌀8 - 9 |
| 11 | 11 to 12 mm | Grommet Small size* 1-hole ⌀11 - 12 |
| 16 | 16 to 17 mm | Grommet Medium size* 1-hole ⌀16 - 17 |
| 4×2 | 2 mm | Grommet Small size* 4-hole × ⌀2 |
| 2×2 | 2 mm | Grommet Small size* 2-hole × ⌀2 |
Note*: Small size and medium size are defined by the grommet manufacturer Murrplastik Systems, Inc.
- The following table shows the correspondence between the diameter of each I/O cable and the applicable grommet number.
(Grommets of number "07", "08" and "11" are shipped with a robot set as standard items)Cable Grommet number Safety I/O cable 08 Digital I/O cable 07 Hand I/O flexible cable 11 - If the cable diameter of your cable is applied to two grommet types, it is recommended to use the smaller one.
For example, if a cable diameter is 7mm, number "06" and "07" grommets are available. In this case, use "06" grommet.
For cables of grommet, the following shows an example of the cable sold by DENSO and cables that customers need to prepare
- Cable sold by DENSO
- Cable that customers need to prepare
| Cable | Grommet number |
|---|---|
| Multibus Cable | 16 |
| Cable | Grommet number |
|---|---|
| USB cable for IPC connection | 04 |
| Ethernet cable | 05 |
| 06 | |
| In User Power wiring, when inputting I/O power from external power by loose wires | 4×2 |
| 2×2 |
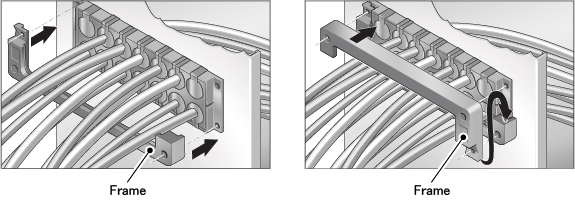
6
After you put grommets for all cables, install two frames for the cable multi-outlet plate to the hole plate.
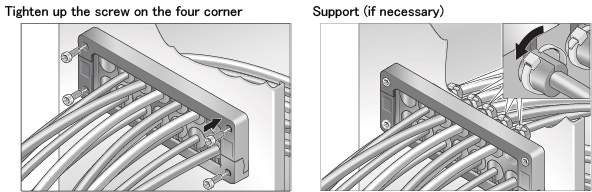
7
Tighten up the screw on the four corner of the cable multi-outlet plate with the following tightening torque.
- Tightening torque: 1.8 to 2.2 Nm
If cables require high tensile strength (e.g.; using heavy cables), use a cable tie to support. Basically, IP54 is ensured without using cable ties.
8
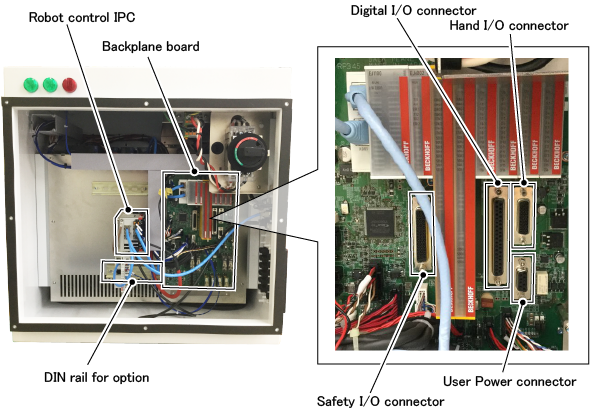
Connect cables to connectors of inside of the robot controller.
This completes the operation.
ID : 10565