
ID : 4933
Start-up procedure of the extended-joint (ball screw)
This section describes the necessary steps to startup the extended-joint (ball screw).
To execute a series of operations with a teach pendant, you need to log in with [Maintainer].
For about the way of changing user level, refer to "Login Operation by Specifying User Level" in "TEACH PENDANT OPERATION GUIDE".
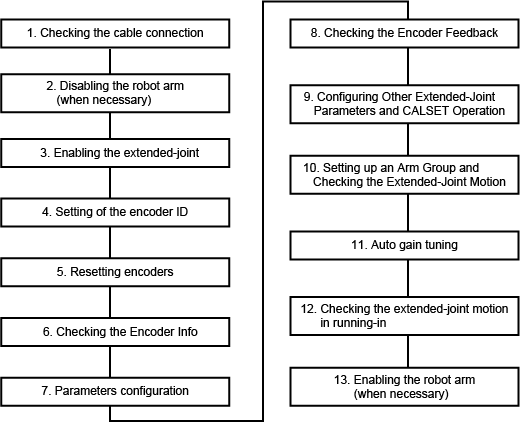
Description of each process
(1) Checking the cable connection
To check that the appropriate cables are connected to the controller.
(2) Disabling the robot arm (when necessary)
Invalid robot arm when necessary. Arm invalidation is required when you adjust the extended-joint without connecting to the robot.
(3) Enabling the extended-joint
To enable the extended-joint.
(4) Setting of the encoder ID
Set the ID of the extended-joint motor.
(5) Resetting encoders
To perform encoder reset when an encoder-related error occurs.
(6) Checking the Encoder Info
To check that the extended-joint encoders are normal status.
(7) Parameters configuration
To set the minimum parameters required manually moving extended-joints.
(8) Checking the encoder feedback
To check that the controller receives a correct response from the extended-joint encoder.
(9) Configuring Other Extended-Joint Parameters and CALSET Operation
To enter other minimum required parameters and perform CALSET.
(10) Setting up an Arm Group and Checking the Extended-Joint Motion
To perform arm group setup and the motion check of the extended-joint.
(11) Auto gain tuning
To perform Auto gain tuning.
(12) Checking the extended-joint motion in running-in
To create a sample program for running-in and run it to check the actual motion of extended-joints while increasing the external speed.
(13) Enabling the robot arm (when necessary)
Enable the robot arm if it is disabled.
ID : 4933
- Related Information
- Checking the Cable Connection
- Disabling the Robot Arm
- Enabling the extended-joint
- Setting of the Encoder ID
- Resetting the Encoder
- Checking the Encoder Info
- Parameters Configuration
- Checking the Encoder Feedback
- Configuring Other Extended-Joint Parameters and CALSET Operation
- Setting up an Arm Group and Checking the Extended-Joint Motion
- Auto Gain Tuning
- Checking the Extended-Joint Motion in Running-in
- Enabling the Robot Arm