
ID : 5264
Operation Using the Teach Pendant
You can monitor the status of system inputs and outputs, user inputs and outputs, and internal I/O in real time. Also, you can simulate robot motions by forcibly turning on the user output signal, hand output signal, and internal I/O signal, or by turning on the dummy signals of user inputs and hand inputs.
Monitoring I/O
Operation path: Basic screen - [F4 I/O]
Display and set I/O monitor.
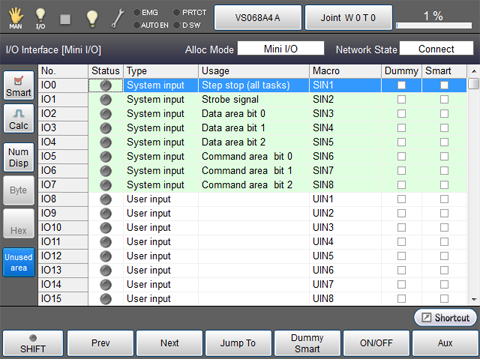
Press [F4 I/O] to display the following [I/O monitor] window.
When you turn the I/O on or off, the output signal of the robot also turns on or off.
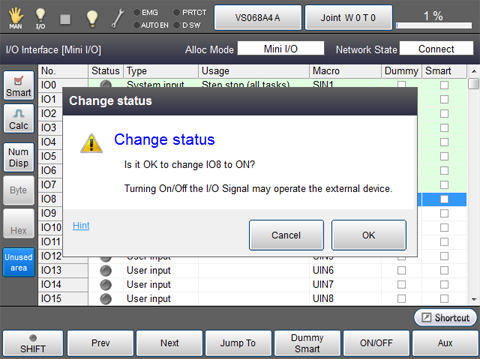
Before operation, make sure that changing I/O state will not cause the serious injury or damages for personnel and devices.
| Keys other than function keys | |
|---|---|
| [Smart] | Display I/O number whose check box for "Smart" is checked. |
| [Calc] | Perform I/O bit calculation. |
| [NumDisp] |
Perform I/O bit calculation. When pressing the [NumDisp] button, this function is enabled and button turns blue color. When this [NumDisp] button is enabled (blue color), the [Ununsed area] button status cannot be changed. |
| [Byte] |
Switch the calculation method of I/O bit. This can be switched while the [NumDisp] button is blue. |
| [Hex] |
Display the calculation result in hex number. This can be switched while the [NumDisp] button is blue. |
| [Unusedarea] |
Display unused I/Os. When pressing the [Unused area] button, this button turns blue color and the function is enabled. This is enabled (blue color) at the default setting. When the [Unused area] button is disabled, the [NumDisp] button status cannot be changed. |
| Available function keys | |
|---|---|
| [F1 Prev] | Available function keys |
| [F2 Next] | Display the next page of the currently displayed I/O information. |
| [F3 Jump To] | Displays numeric keypad. Enter I/O number with numeric keypad, and press [OK] to move to the target I/O number. The selected I/O number will be highlighted. This can be also selected by using jog dial or up and down cursor keys on the tech pendant. |
| [F4 Dummy Smart] | Set dummy input ON/OFF for the selected I/O number when "Dummy Smart" is checked. Set Smart input ON/OFF for the selected I/O numberwhen the "Smart" is checked. |
| [F5 ON/OFF] | Switch ON/OFF the selected I/O number. |
| [F6 Aux] | Display auxiliary functions menu for I/O. |
| [F10 Clear Dummy] | Clear all dummy settings that were set. |
Turning Dummy Inputs ON/OFF
Only for user inputs and hand inputs, dummy inputs can be enabled. This function is helpful for installation.
When dummy inputs is enabled, you can turn the signal ON or OFF with the teach pendant.
How to Enable Dummy I/O
1
Pressing [F4 I/O] on the top screen will display the I/O Monitor window as shown below.
2
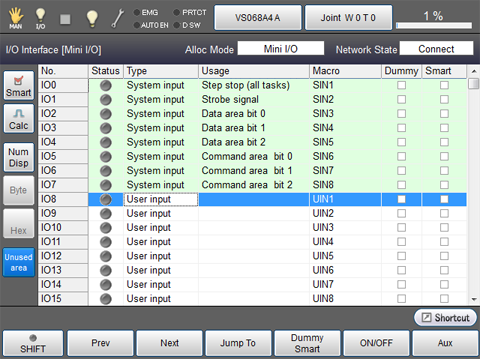
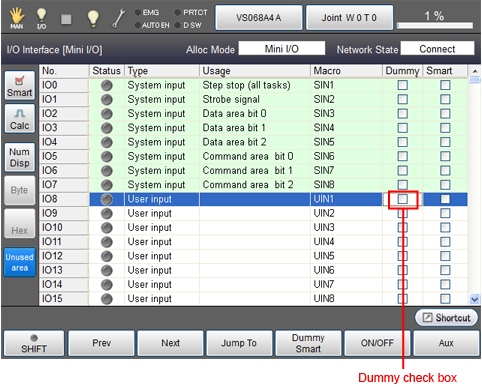
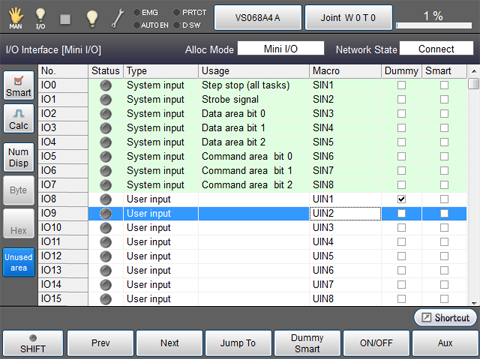
Press a dummy check box on input signal that you intend to perform dummy operation. The vicinity of the check box selected turns white color.
3
Once the [F4 Dummy Smart] is pressed, the [Dummy input setting] window appears. Select [IO8 is changed], and then press [OK].
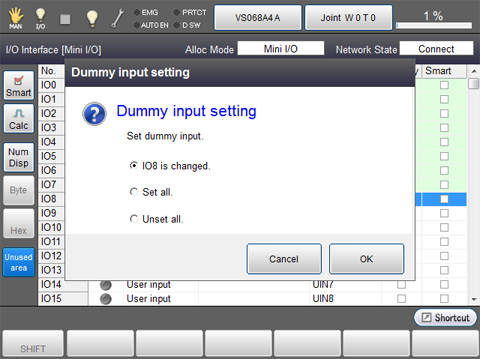
Selected "Dummy" column is checked.
This completes the setting for enabling dummy inputs.
To release desired dummy IO, do the process above (STEP 1 to STEP 3) again.
To enable all dummy IOs, select [Set all] on the [Dummy input setting ] window.To release all dummy IOs, select [Unset all] on the [Dummy input setting] window. (This function is available in Ver.1.8.* or higher.)
Turning ON/OFF Dummy Inputs
How to turn ON the dummy inputs is shown below.
1
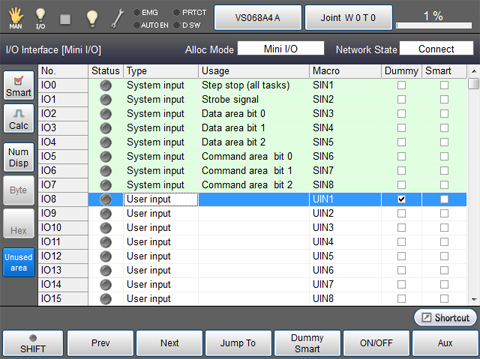
Select the desired I/O number for which dummy input is turned ON or OFF, by using the cursor keys, jog dial or by touching the screen.
2
Press [OK].
3
The I/O number for which dummy input turned ON lights green.

4
To turn the dummy input OFF, repeat the step from 1 to 4.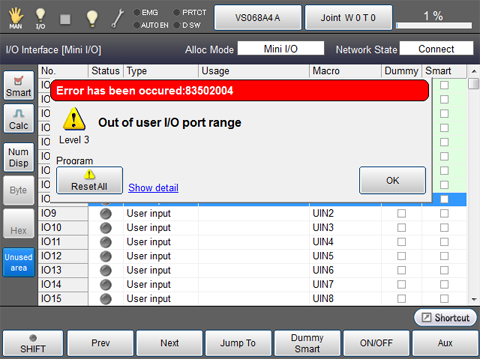
The error below appears if you choose the I/O which dummy I/O settings is not finished.
ID : 5264