
ID : 10785
Grease Filling
For the VMB robot, you need to fill a specified grease on the 1st, 2nd, and 3rd-axis. Grease filling on the 4th, 5th, and 6th-axis are not required.
Attention
- Workers should wear protective equipment, such as a hard hat, safety shoes, safety glasses, according to the risk assessment.
- When removing a filler plug, if the temperature inside the robot is high, hot grease may spurt out. Before filling grease, stop the robot and be sure to wait until the inside of it is cool enough.
- If grease leaks on the floor, it will be very slippery. Clean up the leaked grease immediately.
- Do not apply pressure of 0.03 MPa or more. It will damage the internal oil seal, leading to the grease leakage.
- If the robot runs while excessive amount of grease remains inside, the internal pressure will increase, leading to the shorter lifetime of the oil seal and/or grease leakage. Be sure to drain off the extra grease
- The grease could splash over while the robot running. When you run the robot for maintenance and/or inspection, cover the grease outlet hole with vinyl or alike.
- Refrain from filling grease on the ceiling-, wall-, or tilted surface-mounted robot by customers as these operations require specific knowledge. Please contact our robot service department.
Necessary Tools and Consumables
- Grease (*1)
- Grease nipple (*2)
- Sealing tape (*1)
- Grease gun (manual type)(*1)(*3)
*1: Prepare on your own
*2: Shipped as a standard component.
*3: Do not use an air grease gun.
Recommended Items
| Product | Manufacturer model name | Manufacturer |
|---|---|---|
| Grease | RV GREASE | Nabtesco Corporation |
| Sealing tape | R50356 | ASADA CORPORATION |
Grease Filling Procedure
The following shows the grease filling procedure on respective axis.
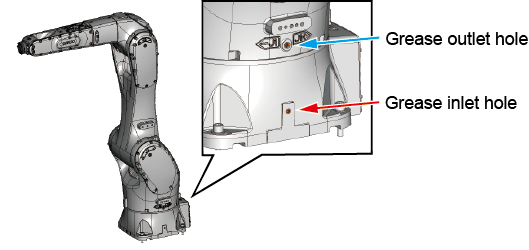
J1
1 Change the Robot Posture
When grease filling in the 1st axis, the robot posture is not specified. Arrange the robot in any posture so that workers can easily operate.
2 Remove the Filler Plugs
Remove the filler plugs of the grease inlet hole and the grease outlet hole.
3 Attach a Grease Nipple
Attach a grease nipple in the grease inlet hole. Wrap a sealing tape around the screw part of the grease nipple.
4 Attach a Grease Catcher in the Grease Outlet Hole
Attaching a grease catcher will prevent the grease splash.
Please prepare a grease catcher by customers.
Also, to prevent grease adhesive on the connector plate, during operation, cover the connector part with a vinyl tarp or alike.
5 Fill the Grease
Fill the following amount of grease.
| Axis | Amount of grease [ml] | Amount of grease [g] |
|---|---|---|
| 1st axis | 1,200 | 1,045 |
Grease will be pushed out from the grease outlet hole.
Catch the drained grease with any plastic bag or alike to avoid dropping the grease on the floor or connectors.
6 Drain off the Extra Grease
After filling the grease, drain off the extra grease with one of the following ways.
- Apply air pressure to the grease inlet hole to drain extra grease.
- With the filler plug removed from the grease outlet hole, run the robot 10 minutes or more.
The internal pressure will increase due to temperature rise, the extra grease will drain off.
7 Attach the Filler Plug
Remove the grease nipples, and then attach the filler plugs in the grease inlet hole and the grease outlet hole.
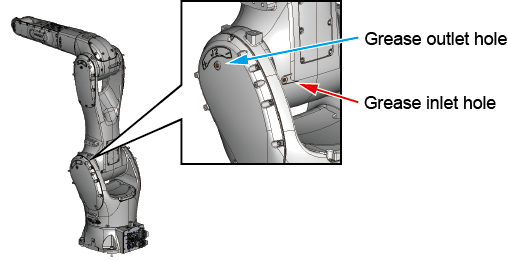
J2
1 Change the Robot Posture
For the robot posture at the grease filling on the 2nd axis, see the following table.
|
J1 | J2 | J3 | J4 | J5 | J6 |
|---|---|---|---|---|---|---|
| Any | 0° | Any | ||||

2 Remove the Filler Plugs
Remove the filler plugs of the grease inlet hole and the grease outlet hole.
3 Attach the Grease Nipple
Attach the grease nipple in the grease inlet hole. Wrap a sealing tape around the screw part of the grease nipple.
4 Attach a Grease Catcher in the Grease Outlet Hole
Attaching a grease catcher will prevent the grease splash.
Prepare a grease catcher on your own.
Also, to prevent grease adhesive on the connector plate, during operation, cover the connector part with a vinyl tarp or alike.
5 Fill the Grease
Fill the following amount of grease
| Axis | Amount of grease [ml] | Amount of grease [g] |
|---|---|---|
| 2nd axis | 923 | 804 |
Grease will be pushed out from the grease outlet hole.
Catch the drained grease with any plastic bag or alike to avoid dropping the grease on the floor or connectors.
6 Drain off the Extra Grease
After filling the grease, drain off the extra grease with one of the following ways.
- Apply air pressure to the grease inlet hole to drain extra grease.
- With the filler plug removed from the grease outlet hole, run the robot 10 minutes or more.
The internal pressure will increase due to temperature rise, the extra grease will drain off.
7 Attach the Filler Plug
Remove the grease nipples, and then attach the filler plugs in the grease inlet hole and the grease outlet hole.
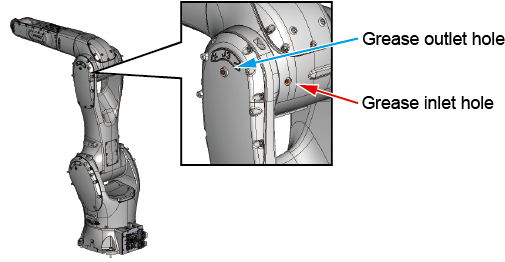
J3
1 Change the Robot Posture
For the robot posture at the grease filling on the 3rd axis, see the following table.
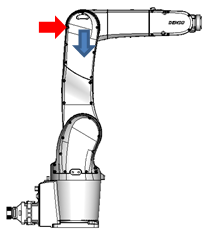 |
J1 | J2 | J3 | J4 | J5 | J6 |
|---|---|---|---|---|---|---|
| Any | 0° | 90° | Any | |||
2 Remove the Filler Plugs
Remove the filler plugs of the grease inlet hole and the grease outlet hole.
3 Attach the Grease Nipple
Attach the grease nipple in the grease inlet hole. Wrap a sealing tape around the screw part of the grease nipple.
4 Attach a Grease Catcher in the Grease Outlet Hole
Attaching a grease catcher will prevent the grease splash.
Prepare a grease catcher on your own.
Also, to prevent grease adhesive on the connector plate, during operation, cover the connector part with a vinyl tarp or alike.
5 Fill the Grease
Fill the following amount of grease
| Axis | Amount of grease [ml] | Amount of grease [g] |
|---|---|---|
| 3rd axis | 402 | 350 |
Grease will be pushed out from the grease outlet hole.
Catch the drained grease with any plastic bag or alike to avoid dropping the grease on the floor or connectors.
6 Drain off the Extra Grease
After filling the grease, drain off the extra grease with one of the following ways.
- Apply air pressure to the grease inlet hole to drain extra grease.
- With the filler plug removed from the grease outlet hole, run the robot 10 minutes or more.
The internal pressure will increase due to temperature rise, the extra grease will drain off.
7 Attach the Filler Plug
Remove the grease nipples, and then attach the filler plugs in the grease inlet hole and the grease outlet hole.
ID : 10785