
ID : 5215
Handling the Teach Pendant
When you handle a teach pendant, be sure to hold the teach pendant with both hands. A teach pendant equips a deadman switch for your safety. You cannot operate the teach pendant unless you grip the deadman switch, as the following shows.
How to Hold Teach Pendant and the Deadman Switch
Grip the teach pendant with both hands when operating it.
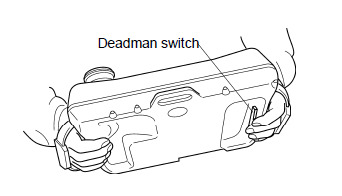
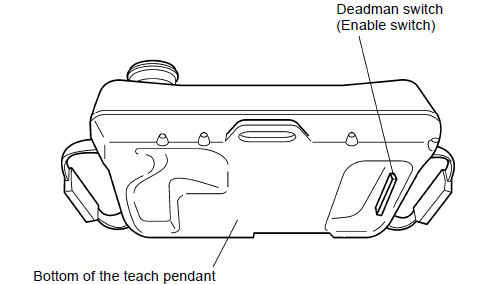
The deadman switch is provided to stop the robot automatically and safely when the operator can no longer operate the robot correctly due to unforeseen circumstances such as the operator suffering a blackout or dying while running the robot manually with the teach pendant. If a situation such as this arises, the strength with which the operator is pressing the deadman switch will become either decrease or increase markedly. The deadman switch is a 3-position switch which is able to recognize and react to the following 3 operating statuses.
- If switch is not pressed or pressed lightly -> Switch is OFF.
- If switch is pressed with medium pressure -> Switch is ON.
- If switch is pressed too hard -> Switch is OFF.
If the switch is OFF or goes OFF, the robot cannot run or the running robot will stop, respectively.
In order to ensure safety, the robot is so designed that in manual mode the deadman switch should be held down for example when the operator presses any of the arm traverse keys.
Deadman switch is also called Enable switch.
Never keep the deadman switch (es) held down with adhesive tape or the like. Doing so may fail to stop the robot when running it in the Manual mode. It is extremely DANGEROUS.
If you switch the operation mode from Manual to Teach check, or from Teach check to Manual with the deadman switch pressed, motor power does not turn OFF. (Ver.1.13.* or higher)
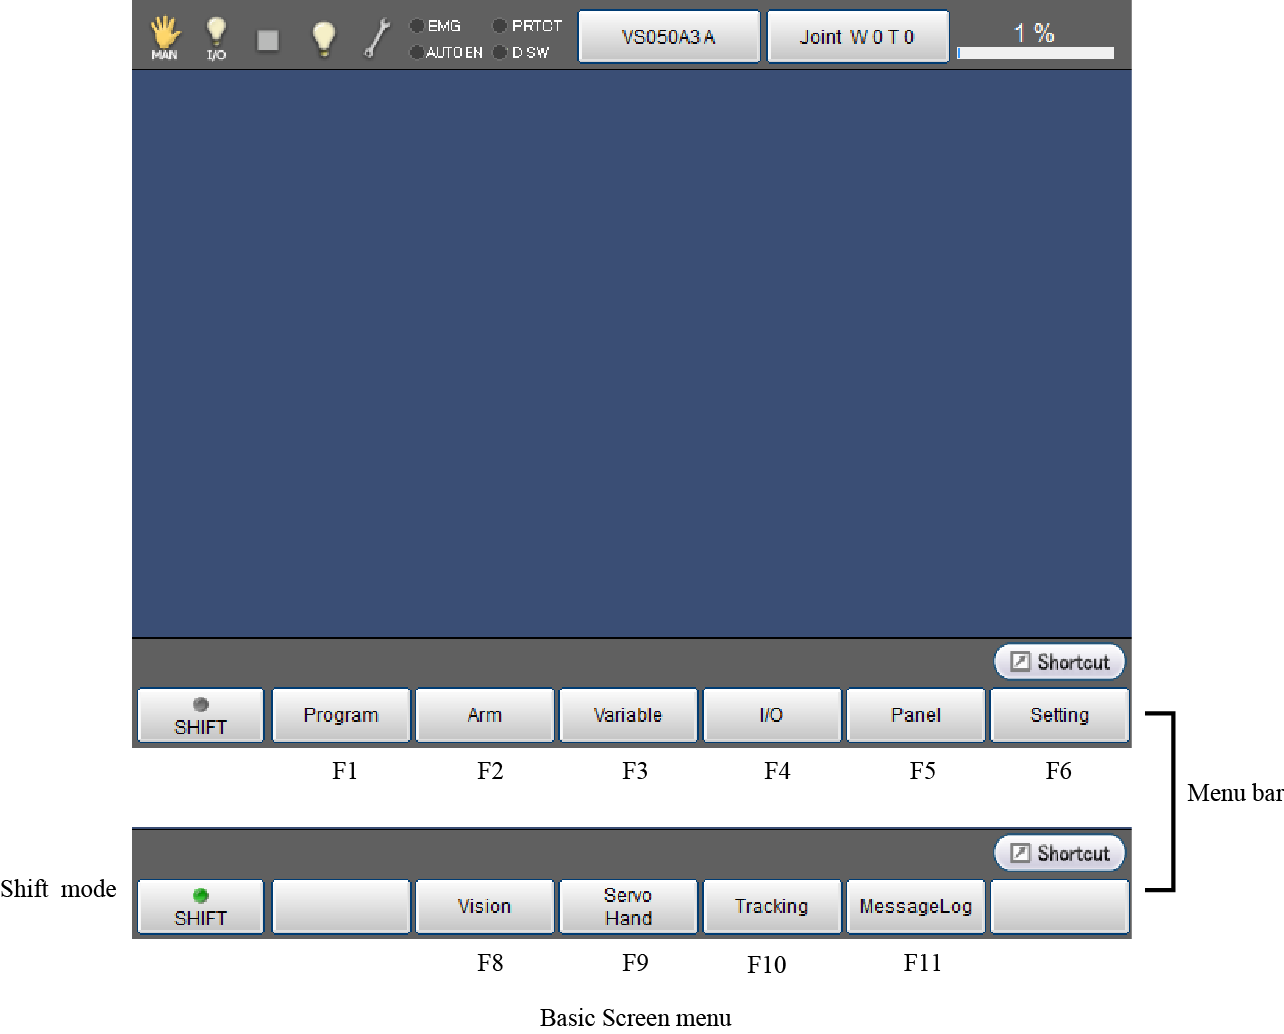
Names of Keys, Buttons, and Switches on the Teach Pendant
The figure below shows the names of keys, buttons, switches, and other sections of the teach pendant.
Before running the robot, learn the location of those keys, buttons, and switches, which will help you run the robot smoothly and safely.

Basic Screen
The language selection screen is displayed when turning on the controller for the first time.
For details about the way of setting, refer to "Turning ON Robot Controller".
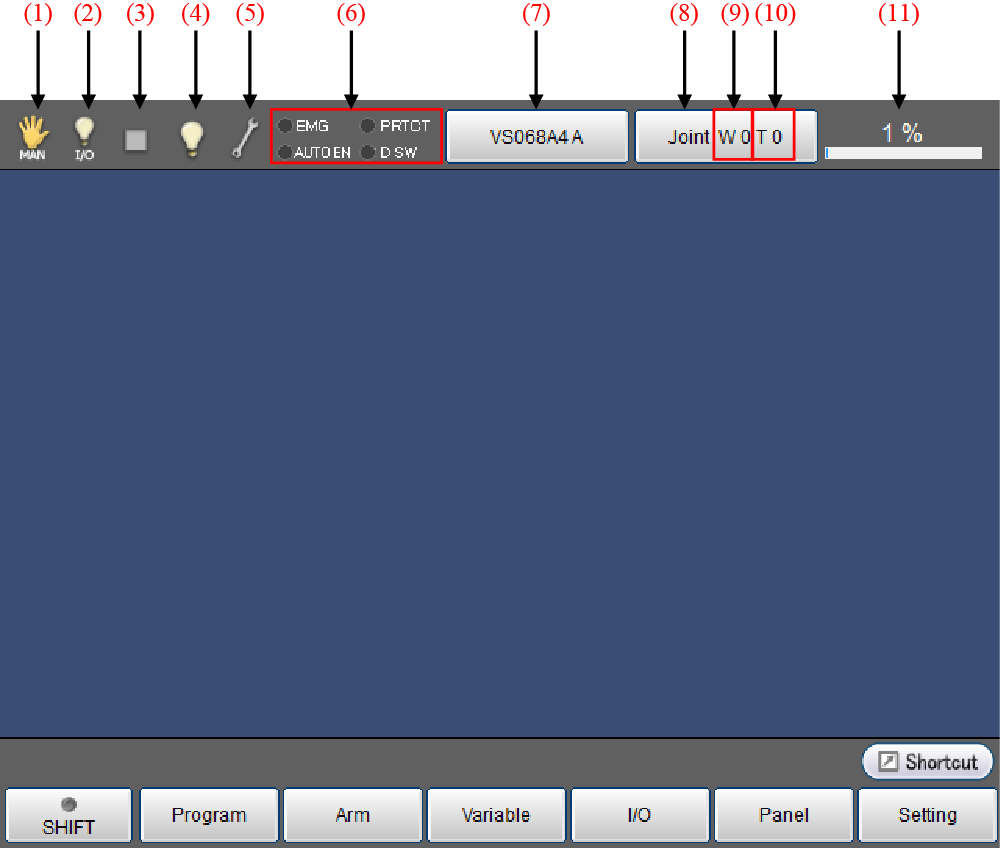
Icons
For details of icons displayed in the basic screen shown below, refer to the following list.
| № | Name | Description | |
|---|---|---|---|
| (1) | Move mode |  |
Auto mode |
 |
Manual mode | ||
 |
Teach check mode | ||
 |
Mode is not selected | ||
 |
Direct mode | ||
 |
Transmitting to PC | ||
 |
Receiving from PC | ||
 |
Read data in USB memory | ||
 |
Write data into USB memory | ||
 |
VirtualTP/RemoteTP is connected. | ||
| (2) | Executable Token |  |
Arbitrary |
 |
COM | ||
 |
EtherNet | ||
 |
I/O | ||
 |
Teach Pendant | ||
| (3) | Program running |  |
Program is under suspension |
 |
Program is executing | ||
 |
Supervisory task is executing | ||
 |
Program and supervisory task are executing | ||
 |
Message output (Display when PrintMsg command execution) | ||
|
Vicinity of the singular point (Sound the warning alarm when in the vicinity of the singular point) | ||
| (4) | I/O status/Arm status |
 |
Pseudo input unused and I/O lock unused (Note)I/O lock:Limit I/O communication with external devices |
 |
Pseudo input used or I/O locked | ||
 |
Virtual fence or Exclusive control is enabled. | ||
| (5) | System state |  |
Normal |
 |
Abnormal
|
||
| (6) | Switch input state | EMG | Emergency stop state |
| AUTOEN | Auto enable state | ||
| PROTECT | Protective stop state | ||
| DSW | Deadman switch state | ||
| (7) | Robot selection button | Select and display the robot type | |
| (8) | Move mode | J : Each axis P : Display X-Y mode T : TOOL |
|
| (9) | Work coordinate | Display the selected work number. | |
| (10) | Tool coordinate | Display the selected tool number. | |
| (11) | Velocity button | Setting and display of the external speed. | |
ID : 5215