
ID : 10596
CALSET Using a Tool
When using the tool (Dial Gauge for CALSET), you can perform CALSET of each robot axis more accurately.
Dial Gauge for CALSET
Components
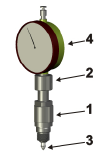
- Dial gauge holder (quantity : 1)
- Conical ring nut (quantity : 1)
- Probe (quantity : 1)
- Dial gauge (scale: 0.01mm) (quantity : 1)
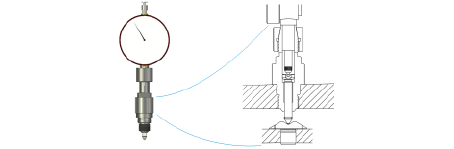
Assembly Diagram
The tool is used by assembling it in the CALSET position of each robot axis.
When assembling the tool, refer to the figure below.
Use of Tool
- Perform CALSET without applying the load of the gripper to the axes (except the 1st axis).
- After using the tool, remove it from the robot and keep it.
CALSET Procedure
Carry out operation with the robot controller turned on.
1
Assemble the tool to the axis to be performed CALSET.
Refer to the following links for the assembling procedure to each axis.
- Assembling Procedure to 1st Axis
- Assembling Procedure to 2nd Axis
- Assembling Procedure to 3rd Axis
- Assembling Procedure to 4th Axis
- Assembling Procedure to 5th Axis
- Assembling Procedure to 6th Axis
2
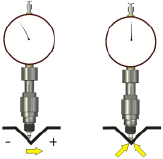
Move the axis to be performed CALSET from the negative direction to the positive direction at low speed and align to the minimum point of the dial gauge.
If it passes through the minimum point, be sure to return to the start position and perform the measurement again. Always move the robot axis in one direction from the negative direction to the positive direction.
3
Use the smart TP to select CALSET.
Refer to the "CALSET Operation" of Smart TP Operation Guide.
This completes CALSET.
After performing CALSET, reinstall the removed protective components.
ID : 10596