
ID : 10663
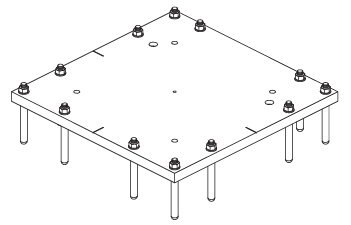
Non Level-adjustable Robot Fixing Plate
This is the robot fixing plate to install between the robot mounting surface and the concrete surface.
Components
- Base plate (quantity : 1)
Weight
About 220 kg
Plate Installation Hole
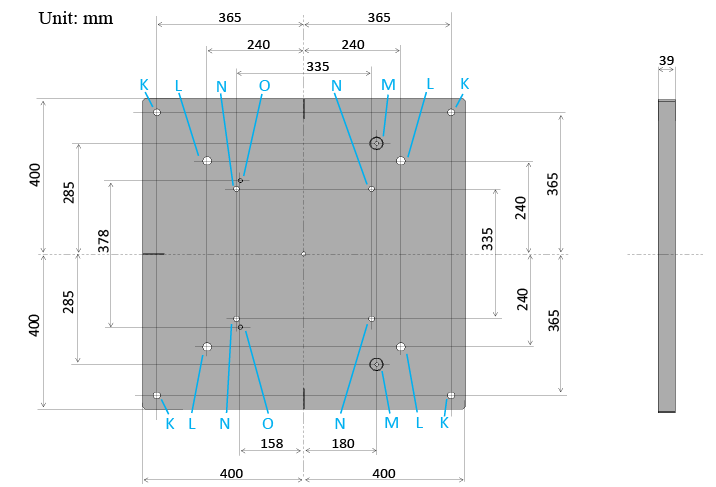
K : For chemical anchor
L : For robot fixing bolts (for VLA series)
M : For the dowel pin (for VLA series)
N : For robot fixing bolts (for VMB series)
O : For the dowel pin (for VMB series)
Installation Procedure
Recommended tool and equipment
- Chemical anchor (*1)
- Drilling machine
- Drill bit for holes ø9 and ø24
- Angle grinder
- Torque wrench with sockets and bits
- Eyebolt M24 (quantity : 4)
- Mortar for metal (*2)
*1 : The following shows recommendations. In addition to the procedure below, handle the chemical anchor according to the instruction manual that came with the chemical anchor you purchased.
| Part name | Manufacturer | Part No. | Hole dimension and diameter | Quantity |
|---|---|---|---|---|
| Chemical capsule | HILTI | HVU M20x170 | ø24x170mm | 12 |
| Threaded anchor rod | HAS-E M20x170/48 | 12 |
*2 : To avoid micromovement of the plate caused by reaction force repeatedly generated by the robot during robot operation, it is recommended to lay the mortar for metal on the concrete surface and make the installation surface horizontal.
Preparation before Installation
1
Put the mark of two vertical axes on the floor which the robot will be installed.
2
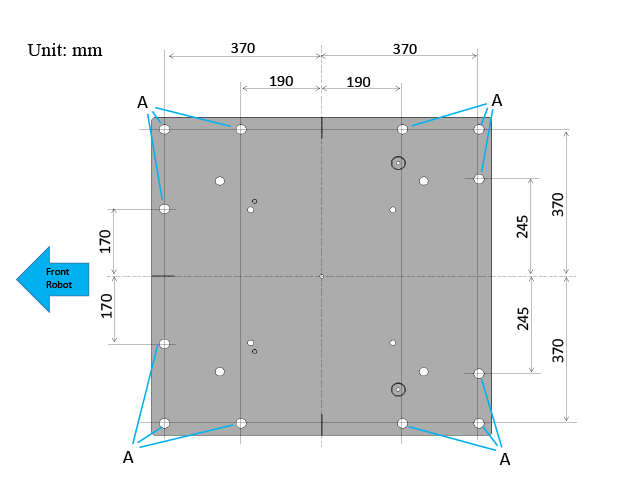
Mark the position of the hole (A) to place the chemical capsules.
3
Pre-drill the floor surface using the drilling machine and the drill bit ø9 (depth 170 mm).
4
Drill the floor surface using the drilling machine and the drill bit ø24 (depth 170 mm).
- Make sure to carry out the drilling vertically to the floor.
- Do not use water for the drilling. The hole must be dry.
5
Remove all the residual material by a vacuum cleaner and make the inside of the holes perfectly clean.
6
Insert the chemical capsule into the hole.
7
After inserting the threaded anchor rod, stir the chemical capsule by rotation and striking to ensure that the chemical components are in contact with the screw.
8
Wait for that the chemical capsule acts, fixes the rod and the rod itself is firmly combined to the floor. The waiting time is about 5 hours.
9
Clean the installation surface on the floor which the robot fixing plate will be placed.
Installation Procedure
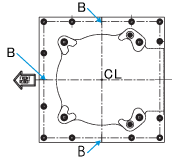
There are three notches (B) on the plate. Axial intersection of notches (B) is defined as the position of the robot 1st axis (reference CL). In correspondence with this position on the plate, there is a dowel pin hole.
1
Insert four eyebolts into the holes (N) on the base plate .

2
Sling the base plate by means of four sling belts (J) (minimum length: 1 m).
3
Lift the plate (about 220 kg) using a lifting device.
4
After spreading the mortar for metal (recommended step), install plate (E) so that the anchor rods (F) can be inserted into the holes in the plate.
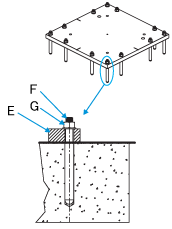
5
Tighten the nut (G) of the anchor rod with tightening torque 150Nm.
6
Loosen and remove eyebolts used for lifting operations.
7
Cut the exceeding thread.
This completes installation of the robot fixing plate.
ID : 10663