ID : 3423
Installing the Flange
1
Install the flange for the robot protective jacket for food processing on the robot unit.
Setting the posture with the following axis angles makes it easier to install the flange.
| Axis | Angle | |
|---|---|---|
| J1 | 0° |  |
| J2 | 0° | |
| J3 | 90° |
|
| J4 | 0° |
|
J5 |
-90° | |
| J6 | 0° | |
2
For the standard type robot, fix the 6th-axis cross roller protective cover to the 6th-axis.
This step is unnecessary for the splash-proof type robot.
Use the accompanied cross screws (M3x10) to attach the cover.
- Mounting screw size: M3x10
- Screw tightening torque: 0.59 Nm +/-20%

Without the protective cover, the jacket or wiring may be damaged depending on the robot motion, resulting in a shorter service life.
3
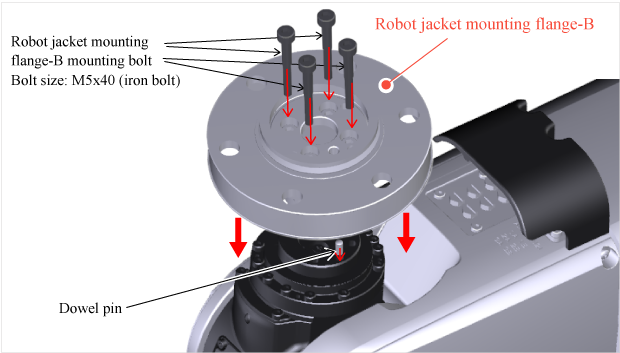
Fix the robot jacket mounting flange-B with the accompanied bolts and dowel pin.
The bolt size and tightening torque are as follows:
- Mounting bolt size: M5x40 mm
- Bolt tightening torque: 5.9 Nm +/-20%
Wipe grease off the outer surface with alcohol before installing the flange.

4
Fix the robot jacket mounting flange-A with the accompanied bolts.
The bolt size and tightening torque are as follows:
- Mounting bolt size: M5x30 mm
- Bolt tightening torque: 5.2 Nm +/-20%

There is a seal (rubber) attached on the back of the flange-A, which is used to bring the flange-A into full contact with the flange-B.

Install the flange-A straight onto the mounting face of the flange-B as shown in the above STEP 3 so that the seal (rubber) on the back of the flange-A is not crushed.
5
Install the O-ring on the flange-A. (In case of an environment where water drops may fall near the end-effector)
Set the roughness of the contact surface with the O-ring to Rz 6.3 (Ra 1.6). Make sure that feed machining is not performed for the contact finish. If the conditions are not met, washing the robot jacket when it is put on the robot with liquid, such as detergent, may cause the liquid to penetrate the jacket.

ID : 3423

