
ID : 5267
Operation Using the Teach Pendant
Monitoring and Modifying Global Variables
Operation path: Basic screen - [F3 Variable]
Display and change the value of variable.
1
Press [F3 Variable] to display the following [Variable] window.
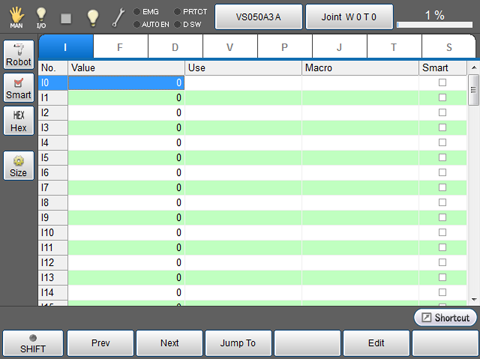
If the robot is External axis specification, [External joint] button appears at the leftmost of the screen.
By clicking [External joint] button, optional window for choosing robot axis and external axis is displayed at the bottom of the window.
2
Select desired type of variable that you would like to monitor or modify. Press desired variable number then the details of variable is displayed.
| Keys other than function keys | |
|---|---|
| [Robot] | Display the current position information of robot on the right side of screen. Button turns blue while the button is pressed. |
| [Smart] | In each variable, display only variable number whose checkbox for "Smart" is checked. |
| [Hex] | If hexadecimal value is allowed to be entered in variable, the display can be switched to hexadecimal display by pressing this button. Button turns blue while the button is pressed. |
| [Size] | Set variable size for each variable. Press button to display [Variable Size] window. Select variables to change the variable size, and press [F4 Edit]. Then, numeric keypad will be displayed. Enter the setting value with numeric keypad, and press [OK] on the numeric keypad to change the variable size. Press [OK] button in [Variable Size] window to confirm the changed variable size. |
| [Variable tab] | Press the variable tab to display the target variable. |
| Available function keys | |
|---|---|
| [F1 Prev] | Display the previous page of the currently displayed variable page. |
| [F2 Next] | Display the next page of the currently displayed variable page. |
| [F3 Jump To] | Select the variable number to display in variable tab, and press [Jump To] to display numeric keypad. Some elements for the selected variable number will be highlighted. |
| [F4 Move To] | Specify the variable number, and then manually move the robot to the registered coordinate value in the specified variable number. This operation is available only for J-, T-, and P-type variable. |
| [F5 Edit] | Select the variable number to change its value, and press [Edit] to display numeric keypad. Enter the value to set with numeric keypad, and press [OK] to change the value. This key is also used to change robot figures of T type and P type variables. Select [Fig] column on variable table then press [Edit] to display [Edit Fig] window. |
| [F6 Get Position] | Obtain the current position of the target robot and save the position data to the specified variable. This operation is available only for J-, T-, and P-type variable. |
| [F8 Copy] | Copy value of variable. Select the variable number to copy, and press [Copy] to copy the variable. |
| [F9 Paste] | Paste the copied variable. Select the variable number to paste, and press [Paste] to paste it. |
| [F10 Switch Display] | Display [Option] window. In [Option] window, display can be switched to [Smart display], and also switched between decimal and hexadecimal displays per variable. |
| [F11 Robot] | Display the current position information of robot on the right side of screen. |
| [F12 Aux] | Display [Menu] window. Select [Number of Variables] in [Menu] to display [Variable Size] window. Select variables to change the variable size, and press [F4 Edit]. Then, numeric keypad will be displayed. Enter the setting value with numeric keypad, and press [OK] on the numeric keypad to change the variable size. |
Monitoring and Modifying Local Variables
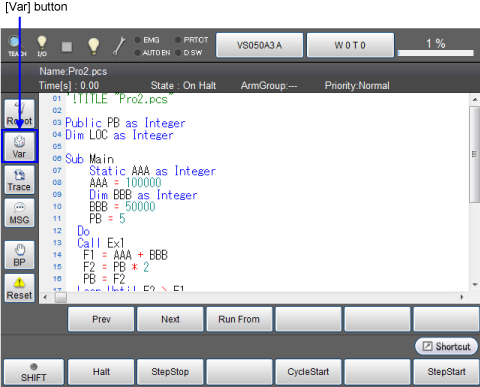
You may find [Var] button on the leftmost of the screen when program code is displayed.
To display variables to be used in the current program, press [Var].
1
Press [Var] button.
2
Variables are displayed on the rightside of the screen.

In this screen, you can check all types of gloval and local variables (except Variant type and Object) and its values which are used in the current program.
- The word "All types of variables" means all of the following variable types.
Integer(Long) / Single(Float) / Double / String / Vector / Position / Joint / Trans / DefIO / Object - You can check the value of local variable when an error occurs. (Ver.1.13.* or higher)
Operation of Switching Button
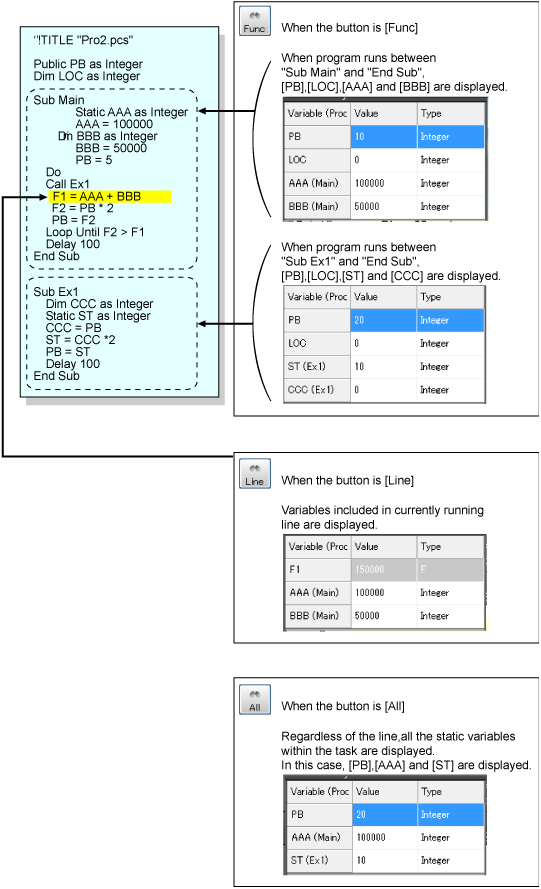
You can switch the variable window among "Function", "single line" and "all lines" by clicking a switching button.
-
[Func] button
I, F, D, V, P, J, T, S, IO, Variant type variables are displayed.
-
[Line] button
When the button is [Line], variables included in currently running line are displayed.
I, F, D, V, P, J, T, S, IO, Variant type variables are displayed.
When the button is [Line], global variables are also displayed. However, when the button is [Func] or [All], global variables are not displayed.
-
[All] button
When the button is [All], all the static variables (variables declared by "Static" or "Public") within the task are displayed. For details about Static variables and Public variables, refer to Variable type and precautions for use of PROGRAMMER'S MANUAL.
If you call other programs by #Include, static variables included in the destination programs are also displayed. For details about #Include, refer to #Include of PROGRAMMER'S MANUAL.
If the index of variable is out of range or is not numerical value, INDEX portion shows "?".
- When you try to display "I101" although the size of I type variable is 100
- When you try to display variables whose INDEX portion is macro name, such as I[slotnum]. When INDEX portion is "?", value does not appear even if variable types are I type, F type, D type or DEFIO type. Press [Edit/Display] button to adjust the target INDEX.
Example
Changing Values of Variables
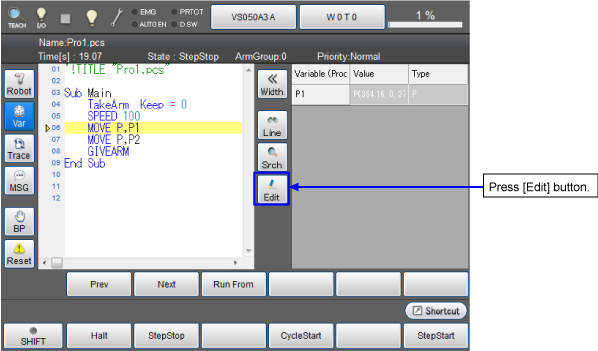
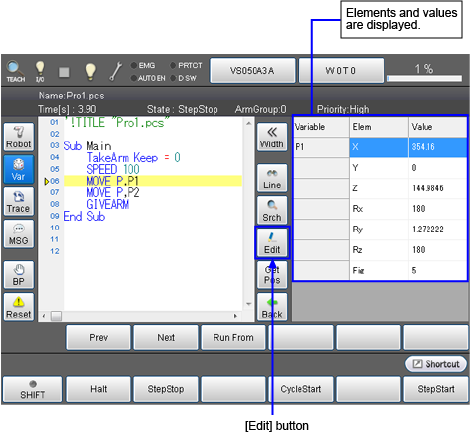
A selected variable is displayed by clicking [Edit] button. Following examples shows how to change values of variables.
1
Click [Edit] button while variables are displayed on the rightside of the screen.
2
Details of selected variable are displayed.
Select a line where you are intend to change, then click [Edit].
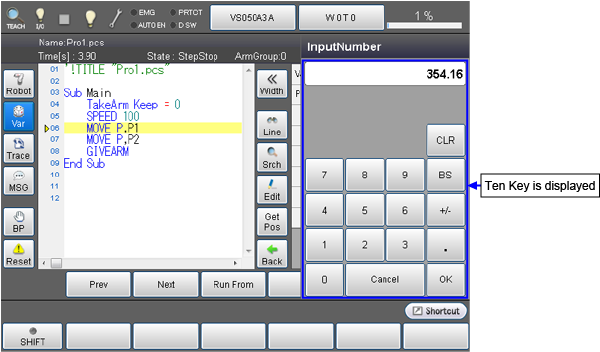
3
Numeric keypad appears. You can change the number by numeric keypad.
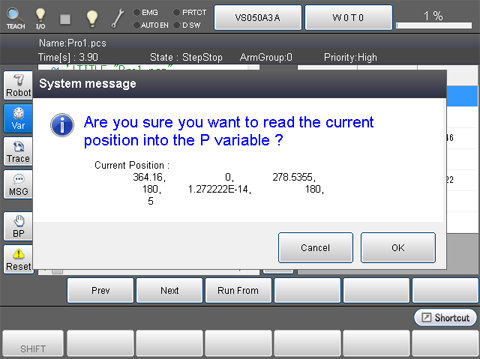
Register the Current Position in a Variable
If P-, J-, or T-type variable was displayed in the above STEP2 in "Changing Values of Variables", [GetPos] button is displayed. Pressing this button registers the current position in a variable.Once the button is pressed, a system message is displayed as shown below. Press [OK] to register the current position. To cancel the setting, press [Cancel].
Changing Variable Size of Global Variables
This section describes how to change number of variables used in each types of global variables.
Operation path: Basic screen [F3 Variable] [F12 Aux] [F1 Number of Variables]
1
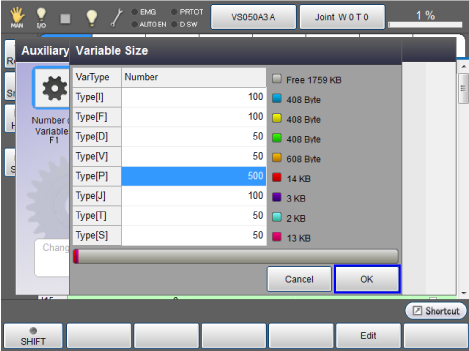
Select a variable to be changed, then press [F5 Edit] to display [Variable Size] window.
If static variables are used, variable size of static variable is also displayed.

2
Click [Number] column of desired variable type, then enter variable size and then press [OK].
In this example, variable size of P type is set 500.
Record of CALSET Position
Because of the installation conditions, if the robot cannot reach to the mechanical end, move the robot to any position and store each axis angle value on the position in J-type variables. Doing so, you can perform CALSET by using them as reference values. (This function is available in Ver.2.8.* or higher.)
If you perform CALSET in other than mechanical end position, place a marking so that users could find CALSET position even if the internal position information is lost.
For details about CALSET, refer to "Method for Executing CALSET".
ID : 5267