
ID : 3369
Homing Function (Return to Origin Function)
Homing function enables to return the target joint to its original position with the given return-to-origin method and the motion speed.
If the encoder of the selective joint is incremental type, the absolute position information will be lost by the power off. Therefore, before starting any selective extend joint motion, you need to perform the return to origin with this command to initialize the position information.
To execute the homing function, use a dedicated command. You can use a teach pendant for this function execution as well.
- If the encoder of the selective joint is absolute type, you do not need to use this function.
- This function is available in Ver.2.7.* or higher.
Advance Preparation
To use the homing function, you need to set parameters to the servo amplifier which runs as a selective joint.
For parameters which determine the return to origin motion, configure the following values by using the setting tool provided by the manufacturer of amplifier you use.
| Index | Sub-Index | Name |
|---|---|---|
| 0x607C | 0x00 | Homing offset |
| 0x6098 | 0x00 | Homing method |
| 0x6099 | - | Homing speeds |
| 0x00 | Number of entries | |
| 0x01 | Speed during search for switch | |
| 0x02 | Speed during search for zero | |
| 0x609A | 0x00 | Homing acceleration |
Return to Origin by Using a Dedicated Command
Use SetHoming command to perform the return to origin under the Auto mode or the Teach check mode.
For information about the command specification, refer to "SetHoming" in the PROGRAMMER'S MANUAL.
Before executing the command, turn the motor off. If the motor is on at the command execution, an error will be displayed.
Before executing the command, execute TakeArm to take control.
If you execute this command under the Teach check mode, you need to turn off the "Motor power ON" option of the deadman switch linkage function. For about the setting procedure, refer to "The Setting of the Deadman Switch Linkage Function".
Executing the SetHoming command will turn the motor on and start the return to origin motion. Once the motion has been completed, the motor power will turn off.
- This command execution is not available under the machine-locked state. Also, you cannot move any robot joints during the execution of this command.
- This command is not available to perform the return to origin motion of robot joints or the internal extended joints.
Example
The following program is sample program of the return to origin motion using SetHoming command.
Example1: Perform the return to origin of the 7th-joint of Robot0 An error occurs unless the return to origin completes within 10 seconds.
Robot0.SetHoming 7, 10000Example 2: Perform the return to origin of the 7th- and the 8th-joints of Robot0 simultaneously. An error occurs unless the return to origin completes within 5 seconds.
Robot0.SetHoming (7, 8), 5000Attention at the command execution
The return to origin motion will stop in any of the following cases.
- Timeout period has been elapsed.
- An error occurs in the servo amplifier.
- An error occurs in the robot controller.
Return to Origin by Using a Teach Pendant
Set the user level "Maintainer" before starting the following operation.
1
Operation path: [F2 Arm]-[F12 Maintenance]-[F10 Joint Settings] -[F5 Servo Parameter]
On the Servo Parameter window, check that the "Joint enable/disable setting" is set to "Enable". If "Disable" is selected, select "Enable" with referring to "Enabling the extended-joint".
From the function keys on the bottom of the window, press [F4 Homing].

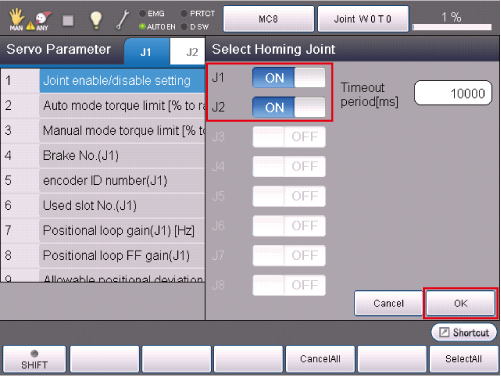
2
On the Select window, select the target joint of the return to origin, and then press [OK].
3
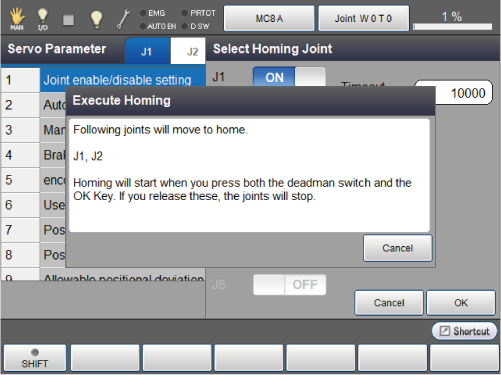
A system message for confirmation appears.
While pressing the deadman switch, press [OK]. The return to origin motion continues while the buttons are pressed. The progress is displayed in the window.
4
Once the return to origin completes, a system message appears.
If you release any button during the motion, the motion is interrupted and an error message appears. If the error occurs, repeat the process from the Step1.
ID : 3369