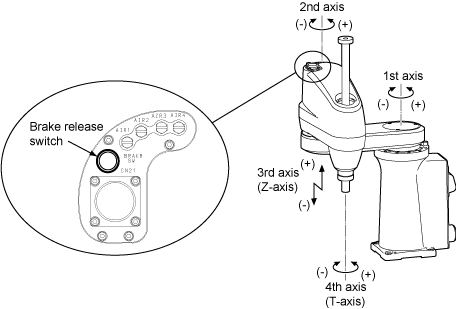
Moving Each Axis with Motor Power OFF in Emergency Stop
This section describes how to move each
axis with the motor power being OFF when the robot is in an emergency stop.
Note that moving the 3rd (Z) and 4th (T) axes requires releasing their brakes
beforehand.
Performing
the brake release operation drops the Z axis. Make sure beforehand that the
release operation will not cause bodily injuries or equipment damages.
Le desserrement du frein provoque la chute de l'axe Z. Vérifier au préalable que le desserrement du frein ne risque pas de provoquer des blessures ou d'endommager l'équipement.
Moving the Axes in an Emergency Stop
| Axis |
How
to move the axes |
| 1st
axis |
Move the robot arm by hand. |
| 2nd
axis |
| 3rd
axis
(Z-axis) |
For
robot units except UL-Listed ones
- Reset the
emergency stop state as follows.
-
If the
emergency stop has been triggered by the teach pendant or mini-pendant, turn
the Emergency stop button on the pendant clockwise; if it has been triggered
by the equipment, restore the emergency stop switch to the short-circuited
state.
- Release
the brakes with either of the following procedures and then move the target
axis by hand.
- Use the brake
command with the teach pendant or mini-pendant
- Enter the
direct mode with the teach pendant and press the brake release switch
Note 1: For
detailed procedures, refer to "Displaying and Setting the Arm Maintenance Functions" of TEACH PENDANT GUIDE.
Note 2: On
robot units except UL-Listed ones, the brake release switch is enabled only
in direct teaching mode.
For UL-Listed robot units
- When the controller power is ON, move the axis by hand while holding down
the brake release switch.
Note: On UL-Listed robot units, the teach pendant or
mini-pendant cannot release the brakes and the direct teaching mode is not
supported.
|
| 4th
axis
(T-axis) |
|
When moving the robot by hand, hold
by a part other than the plastic cover.
