
ID : 4834
Securing the Robot Unit
1
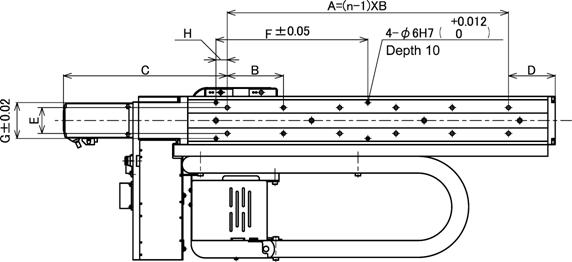
Drill 2 x n tap holes in the robot mount where the robot unit is to be secured, according to the dimensions shown below.
| X-axis stroke | 450mm | 760mm | 1060mm | |
|---|---|---|---|---|
| Dimensions in the figure below (mm) | A | 500 | 900 | 1200 |
| B | 100 | 150 | 150 | |
| C | 291 | 285 | 285 | |
| D | 58 | 55 | 55 | |
| E | 46 | 50 | 50 | |
| F | 270 | 450 | 600 | |
| G | 64 | 80 | 80 | |
| H | 20 | 0 | 0 | |
| n (Qty) | 6 | 7 | 9 | |
| Hex. socket-head bolts for securing | M6x18 | M8x20 | M8x20 | |
| Tightening torque | 14.7±2 N▪m | 35.3±7 N▪m | 35.3±7 N▪m | |
If you remove and reinstall the robot unit for maintenance or other jobs, you need to correct an out-of-position error in teaching.
2
Temporality secure the robot unit to the intended installation position, following the instructions given in "Transporting the robot unit ."
3
Firmly secure the robot unit with bolts to the specified tightening torque.
4
Mount the X-axis cover.
Be sure to tighten all bolts firmly. If any one of those bolts is loose, vibration of the robot system may occur. When designing the robot mount, take care not to cause trouble due to improper installation. Failures which arise from improper installation shall not be covered by the warranty.
ID : 4834