ID : 5899
Command Input Supporting Function
Overview
With this function, some commands are automatically entered.Since this function automatically inputs necessary parameters at once, you can complete programming without writing whole command lines.This function is available only for the manual mode operationin Version 1.8.* or later.
Command Input Window
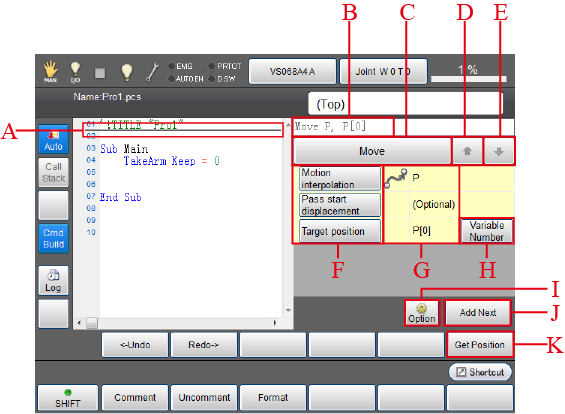
| Symbol | Item | Description |
|---|---|---|
| A | Command adding cursor | This specifies a line where a new command will be added. To move this cursor, touch the screen directly, or use the up-and-down arrow keys, or the jog dial. |
| B | Command string area | Display currently selected command and parameters with a character string. |
| C | Command selection button | Move to the command list selection window. |
| D | Undo | Display the previous page on the command list. |
| E | Redo | Display the next page on the command list. |
| F | Parameter button | Pressing a parameter button will display detailed settings of the parameter. |
| G | Parameter value | Display currently set parameter values. |
| H | Parameter values setting button | This button appears when a parameter requires a value input. With displayed numeric keypad, enter a value, and then press [OK] button to confirm the value.There are two buttons.
|
| I | Option button (Ver.1.12.* or higher.) |
Display the options when [Add Next] is selected with the Approach or Move command.Select from the following three and press the [OK] button.
|
| J | Add Next | Add a currently set command and parameters' character strings to the command adding cursor position. |
| K | Get Position button |
Read the coordinates of the current robot position. (*1) |
*1: This allows you to obtain the current position into a variable, also if immediate values are used, write the current position's value over the values written in a program.
- For variables
If variables are used, values are stored in the variables.
It is impossible to obtain the current position if any of variable, function, or macro definition is used as an index of P-type, J-type, or T-type.Move P, P[0]Move P, P[aaa] 'Impossible to obtain the position
- For immediate values (Ver.1.13.* or higher.)
If values are written in a command, these values will be replaced by the current position's values.
It is impossible to obtain the current position if any of variable, function, or macro definition are used as elements of P-type, J-type, or T-type.Move P, P( 446.7207, 275.725, 329.036, 180, -0.0122849, -148.3163, 5 )Move P, P( aaa, 275.725, 329.036, 180, -0.0122849, -148.3163, 5 ) 'Impossible to obtain the position
Procedure
The following shows how to use the command input supporting function.
- Select a command.
- Select parameters to set, and input values.
- Insert a command.
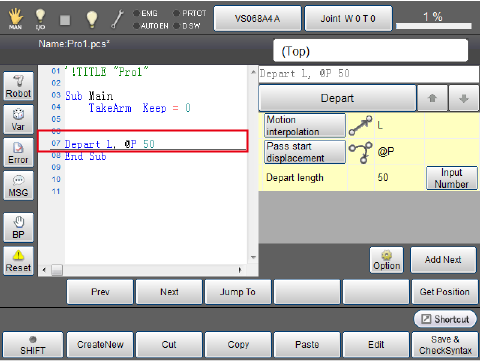
In this example, "Depart L, @P 50" is inserted in the seventh line of the program.
1
Press [F1 Program]. Once a program list is displayed, select a program file to edit. Press [F5 Edit], and then press [Shift]. Press [CmdBuild] on the left of the screen.
To display the Command input window.
2
Select a line where you will insert a command. Move the command adding cursor in the sixth line of the program. To move the cursor, touch the screen directly, or use the up-and-down-arrow keys, or the jog dial.
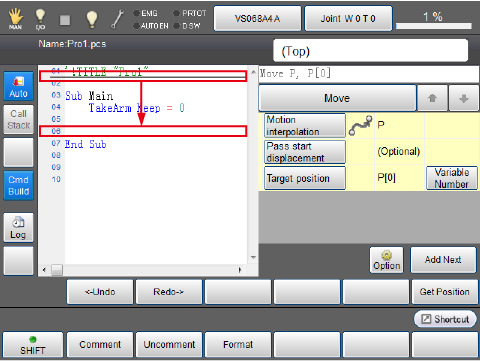
The command adding cursor moves to the sixth line.
3
Press the [Command selection] button.
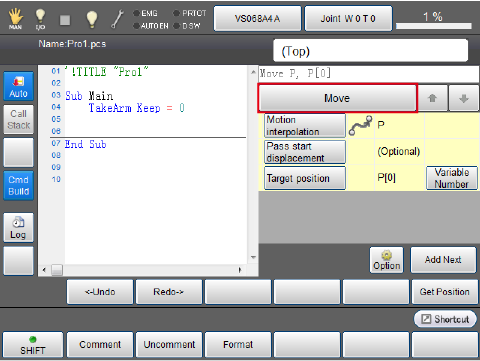
A command list appears.
4
Select [Depart] from the command list.
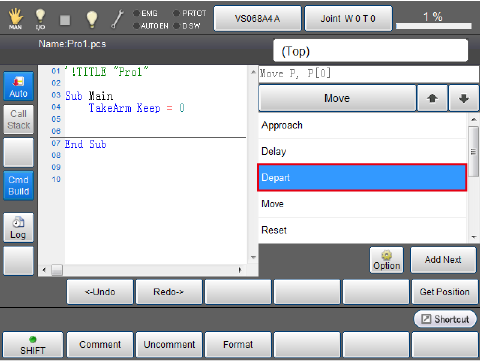
[Depart] command has been selected.
5
Set a motion interpolation. Press a [Motion interpolation] button.
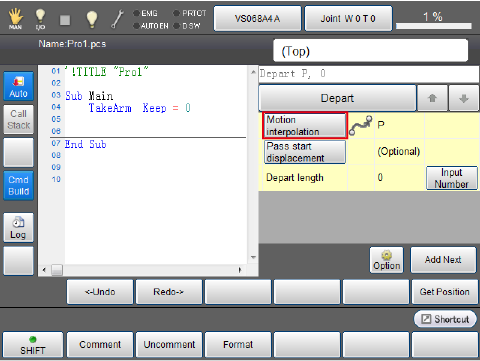
A motion interpolation list appears.
6
From the motion interpolation list, select [L].
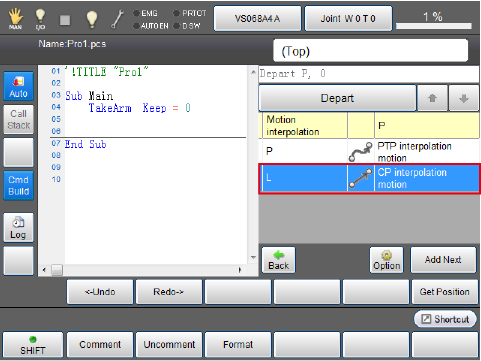
Motion interpolation has been set.
7
Set the distance of pass start displacement. Press [Pass start displacement] button.
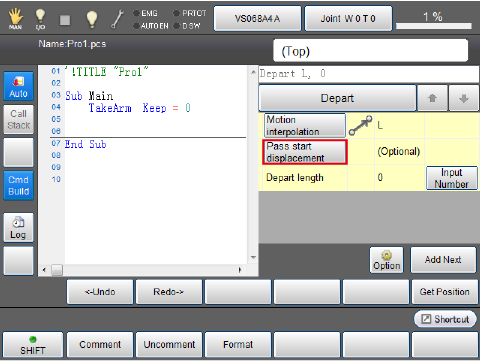
The pass start displacement list appears.
8
From the pass start displacement list, select [@P].
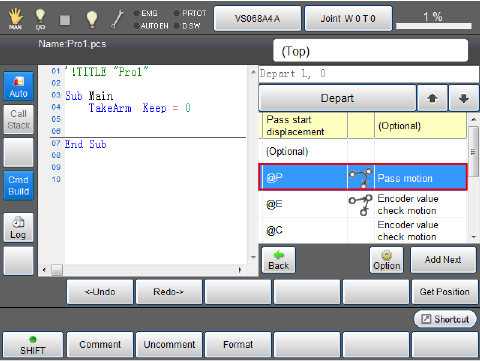
The distance of pass start displacement has been set.
9
Set the depart length. In the Depart length line, press the [Input Number] button.
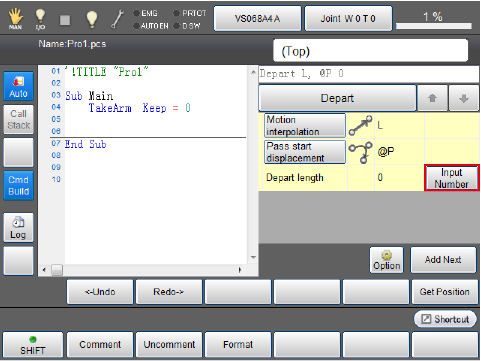
The numeric keypad appears.
10
With the numeric keypad, enter "50", and then press [OK].
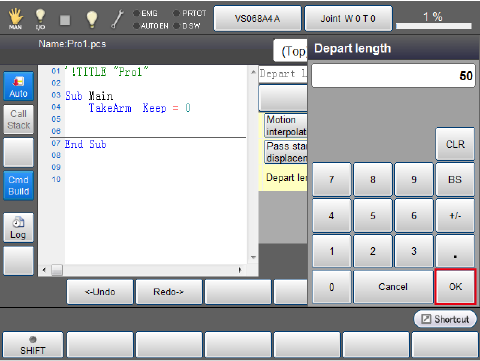
Depart length has been set.
11
Insert the command. Press the [Add Next] button.
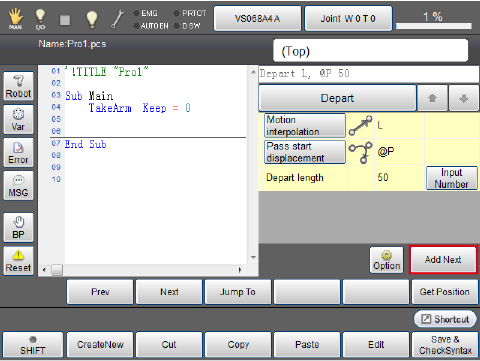
Depart command has been inserted in the seventh line.
ID : 5899

