
ID : 3702
Daily Inspections
Before starting operations, check the items listed below every day.
Inspections to be Made with the Power OFF
For inspection in the power off state, turn off the main disconnecting switch (power plug) before inspection to prevent the damage (such as electric shock) due to leakage current and grounding fault.
| Check: | How to check: | Criterion | What to do: (See note below.) |
|---|---|---|---|
| Connectors (*1) | Visually | No looseness, disengagement or dirt. | Engage the parts properly and clean them.(*3, *4) |
| Cables | Visually | Free of damage or gouges. | Repair or replace. |
| Robot unit | Visually (*2) | No grease leak | Wipe off grease |
| Check the robot fastening condition to the installation surface | Slightly push the robot base part to the front, back, left and right side. | No rattling. | Tighten the robot base mounting bolts |
| Emergency stop box holder for tablet | Check if the adhesiveness of double-sided adhesive tape is not weakened. | The holder shall not be removed from the tablet when the emergency stop box is set. | Replacement (*5) |
*1: For the first few times of use after shipment, you may find grease ooze. Wipe off them before use.
*2: For the first few times of use after shipment, you may find wear debris around axes. Wipe off them before use.
*3: When a connector is inserted into a wrong port, it does not function properly. Be careful not to insert the connectors of the same shape (Ethernet connector and USB connector) into the wrong ports.
*4: Remove any dust accumulated on the plug to avoid any fire from occurring from tracking.
*5: For purchase, contact our sales representatives.
Do not use the holder with weak adhesiveness.
Doing so, the holder may be removed from the tablet when the emergency stop box is pressed.
Inspections to be Made with the Power ON
| Check: | How to check: | Criterion | What to do: (See note below.) |
|---|---|---|---|
| LCD on the tablet | Visually | Properly displayed | Repair or replace. |
| Cooling fan in the robot | Hold up a hand to the exhaust port and check the wind is blowing off. | Should work properly. | Repair or replace. |
| EMERGENCY STOP button on the emergency stop box | Press the EMERGENCY STOP button. | The robot should come to an emergency stop. | Repair or replace. |
| Robot unit status display LED | Visually (Refer to "How to Check the Condition of the Status Display LED" in the below of this page.) | Should light up properly. | Inspect and repair. |
- Some repair and replacement jobs, shown in "What to do:" column, may involve special work. Contact the Sales/Contact(Authorized Representative).
- If any axes do not move, or move but only a little, the oil coating on the bearing of axes may not be formed sufficiently, it could leading to the early wear off.
To prevent early wear-off of bearings, move the target axes in sufficiently large angle for more than a few times a day.
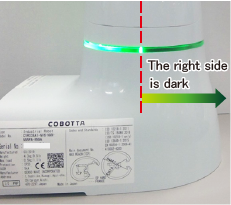
How to Check the Condition of the Status Display LED
If a part of the status display LED fails, the half of the LED becomes dark. If all the LED fails, it does not light up.
The following table shows the lighting patterns when the status display LED fails. With reference to the table, check the condition of the status display LED.
| Viewed from the direction where the connector panel is located in the left. | |
|---|---|
| Normal condition | 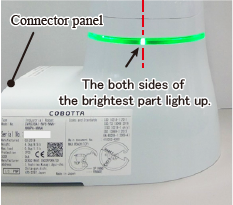 |
| Malfunction pattern |
|

ID : 3702