
ID : 11084
Setup Procedure
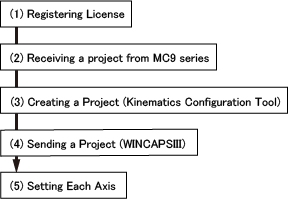
It is possible to do "(5) Setting Each Axis" before doing "(2) Creating a Project".
(1) Registering License
This function requires a license key for each controller since this is an option function.
To enter a license key, use Smart TP.
For detailed information, see "Registering License".
Kinematics configuration of the robot type X, XY, XYZ, XYZT is equipped as standard function of MC9 series. Therefore, this function is available without a license.
If you don't have the license, Kinematics configuration of X, XY, XYZ, XYZT is automatically set according to the number of robot joints selected in "Configuring Robot Joints". (For example, if you select 4 joints as the robot axis range, Kinematics configuration of XYZT is internally set).
(2) Receiving a project from MC9 series
From the MC9 series that you intend to configure Kinematics, receive a project with WINCAPSIII.
For information on how to receive a project, see the followings.
(3)Project setting(Kinematics Configuration Tool)
Open a project received by WINCAPSIII with Kinematics Configuration Tool, and configure it.
(4)Sending a Project(WINCAPSIII)
From a project configured by Kinematics Configuration Tool, send parameters with WINCAPSIII.
(5) Setting Each Axis
Set each axis respectively to operate a robot.
Complete all the steps of How to Configure the Auxiliary Axis Mechanism" in "Auxiliary Axis Guide".
In addition, if you use a parallel link robot, you need to set parameters for some items. For details, refer to the Additional Setting Parameters of Parallel Link Robot.
For setting the arm parameters, refer to "Arm Parameter Settings" in "Product Information of MC9 Series".
When setting the gain parameter in the control system, if the conditions of conduct on auto gain tuning are not met, perform manual gain tuning.
For details, refer to "Auto Gain Tuning Procedure" in "Auxiliary Axis Guide".
ID : 11084
- Related Information
- Project Setting
- Arm Length Setting
- Additional Setting of 4-Axis or 6-Axis Robots