
ID : 3410
Basic Knowledge (The Concept of Master and Slave)
This section describes the basic knowledge of the conveyor tracking operation in the following subsections.
- Conveyor Information Sharing
- Two Robots Perform Conveyor Tracking Operation on the Different Conveyor
- Three or More Robots Share a Single Conveyor
Conveyor Information Sharing
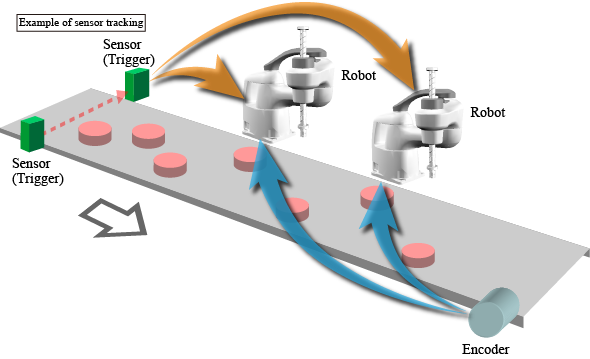
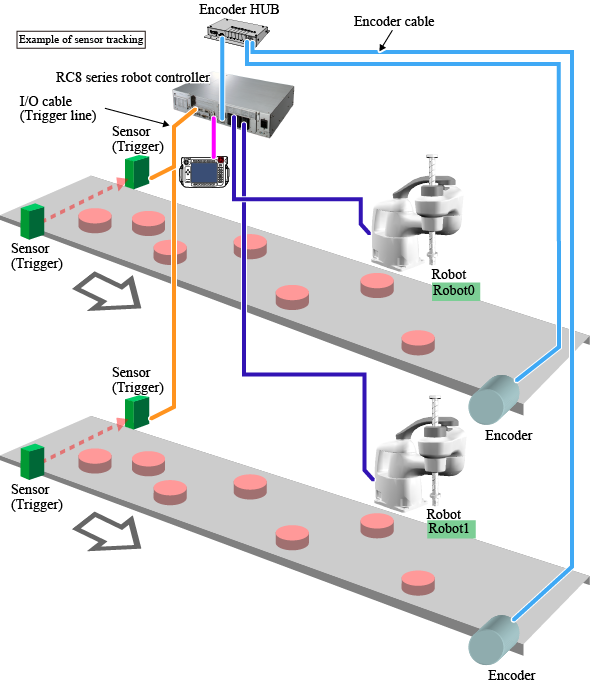
If two or more robots pick workpieces carried by a single conveyor, the conveyor information must be shared by each robot.
Assuming that two robots pick workpieces carried by a single conveyor.
Conveyor Tracking without Dual Arm Control
If the dual arm control function is not used, you need to prepare two robot controllers.
In this case, you need to specify which robot controller controls the conveyor's encoder and triggers. This robot controller is called as a "master controller". The other robot controller is called a "slave controller" since this controller is shared the conveyor's information from the master controller.
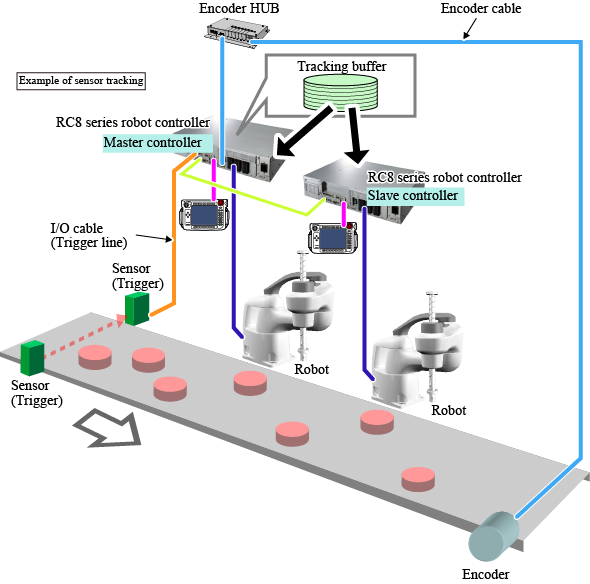
To control the conveyor's encoder and triggers, do the following three configurations for the master controller.
| Encoder setting | Encoder-related setting, such as, encoder-connected joint number. |
|---|---|
| Trigger setting | Trigger-related setting, such as, trigger-connected I/O port number. |
| Data registration to the tracking buffer | At the trigger signal input timing, register the encoder data to the tracking buffer in the master controller. |
Tracking buffer data is shared by the master and slave controllers to achieve conveyor tracking with two robots operation.
Conveyor Tracking with Dual Arm Control
When the dual arm control function is used, the system uses one robot controller only. Therefore, the roles of master and slave are assigned to each robot.
In the dual arm control function, robot names (Robot0 and Robot1) are assigned to respective robot. Specify which robot (Robot0 or Robot1) is a master.
Assuming that the Robot0 is set as a master. In this case, the above-mentioned three configurations for the master controller must be done for the Robot0.
For the encoder setting and trigger setting, use a teach pendant. If the dual arm control function is used, only one teach pendant is connected. Therefore, at the configuration, you need to specify which robot (Robot0 or Robot1) is configured.
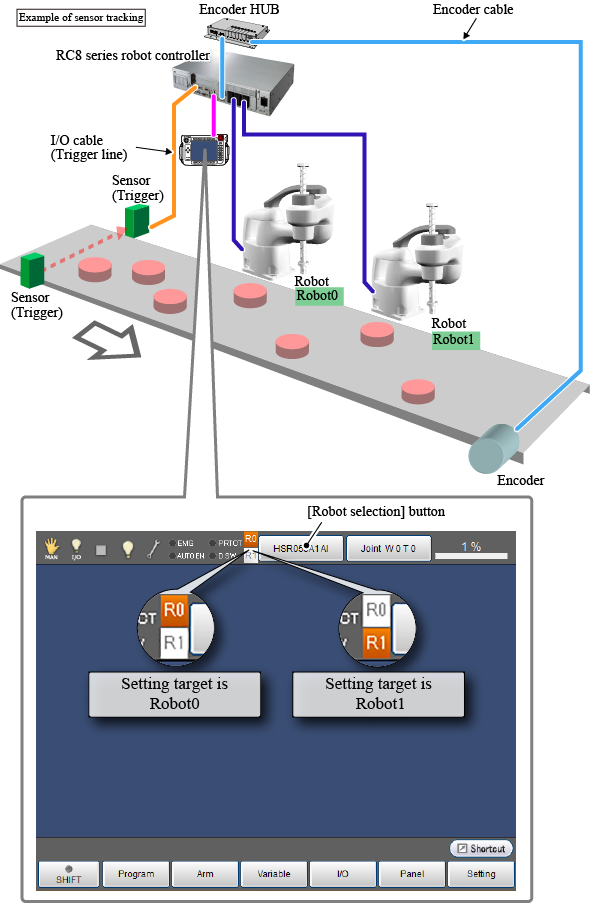
To switch Robot0 and Robot1, use [Robot selection] button. Once the Robot0 is selected, an icon on the left of the [Robot selection] button turns orange. While the icon is orange, perform the encoder setting and trigger setting.
If you set Robot0 as a master, set Robot1 as a slave. There are some configurations for the slave as well. Before you configure the slave (Robot1), change the target robot to Robot1 with the [Robot selection] button.
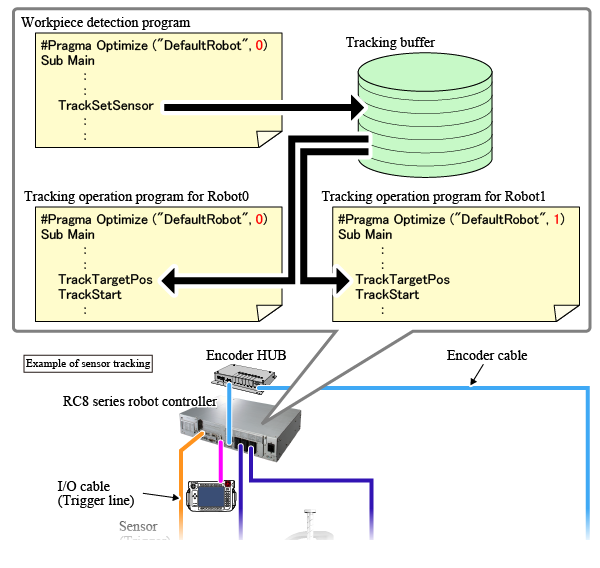
Data Registration to the Tracking Buffer
Data registration to the tracking buffer is done by program. When the dual arm control function is used, you need to specify the target robot (Robot0 or Robot1) of the command.
If Robot0 is set as a master, add "Robot0." in front of "TrackSetSensor" command which registers data into the tracking buffer. In this timing, if you add "Robot1." in front of "TrackSetSensor", an error occurs because Robot1 is not set as a master.

"TrackSetSensor" is a sensor tracking command. For vision tracking, use "TrackSetVision".
In addition to "TrackSetSensor", there are other commands that must be specified with the robot name (for example, "Robot0." and "Robot1." ). Entering robot names for each command might reduce the operation efficiency. In this case, use a preprocessor "#Pragma Optimize ("DefaultRobot", N)".
Commands which require the robot name entry are almost same as the ones used in the cooperative control function. Refer to the "Commands that Need to Specify a Robot" in "Command" in the "COOPERATIVE CONTROL FUNCTION GUIDE".
For "N" in the preprocessor "#Pragma Optimize ("DefaultRobot", N)", enter the robot name number. For example, enter "0" if the robot name is "Robot0", enter "1" if the robot name is "Robot1".
Assuming that the following code is written at the top of the program.
#Pragma Optimize ("DefaultRobot", 0)In this program, for any command that requires a command name, if no robot name is entered, the command runs for "Robot.0".
Suppose that the following program is written.
  #Pragma Optimize ("DefaultRobot", 0)

  TrackSetSensor 1, 1
If the above program is executed, the result will be the same as the following program execution.
Robot0.TrackSetSensor 1, 1For the conveyor tracking programming, in addition to the tracking buffer registration operation, you need to create the tracking motion. The following shows the tracking motion program example with a preprocessor "#Pragma Optimize ("DefaultRobot", N)".
Two Robots Perform Conveyor Tracking Operation on the Different Conveyor
When the dual arm control function is used, if two robots perform conveyor tracking operation on the different conveyor, the two robots do not need to share the encoder and triggers. Therefore, set both Robot0 and Robot1 as a master. (Each robot has no slave robot.) Encoder setting, trigger setting, and the tracking buffer data registration must be done for Robot0 and Robot1 respectively.
In this step, pay attention to the joint number where the encoder connects. Encoder setting must be done for the master. Since both Robot0 and Robot1 are the master, you need to set encoder for both of them.
Assuming that the 7th joint connects to the encoder used for Robot0, and the 8th joint connects to the encoder used for Robot1.
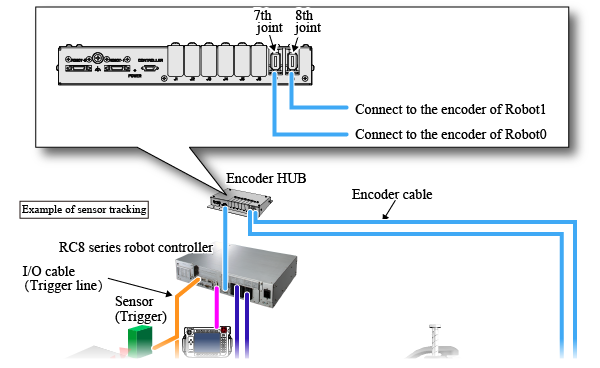
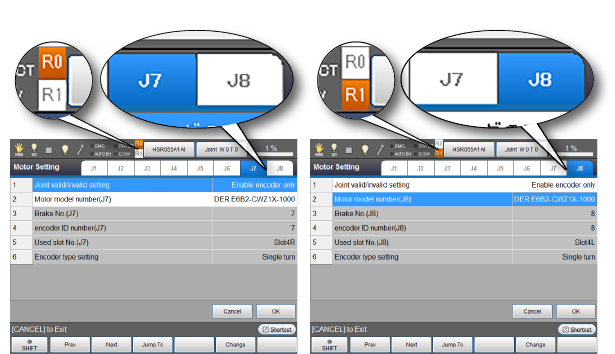
As the figure above, in the [Motor Setting] window, the 7th joint setting is done for Robot0, and the 8th joint setting is done for Robot1.
If you set both the 7th joint and the 8th joint to Robot0, the system does not work properly. Also, if you set both the 7th joint and the 8th joint to Robot1, the system does not work properly as well.
For the [Joint valid/invalid setting] parameter, note that you cannot set a certain joint to [Enable](including [Enable encoder only]) on both Robot0 and Robot1. In the figure above, in Robot0 setting, the [Joint valid/invalid setting] of the 7th joint is [Enable encoder only]. Therefore, you must set the 7th joint of Robot1 to [Disable].
Other than the motor setting, encoder joint number, trigger setting, data registration to the tracking buffer for the conveyor must be clearly specified with the target robot number.
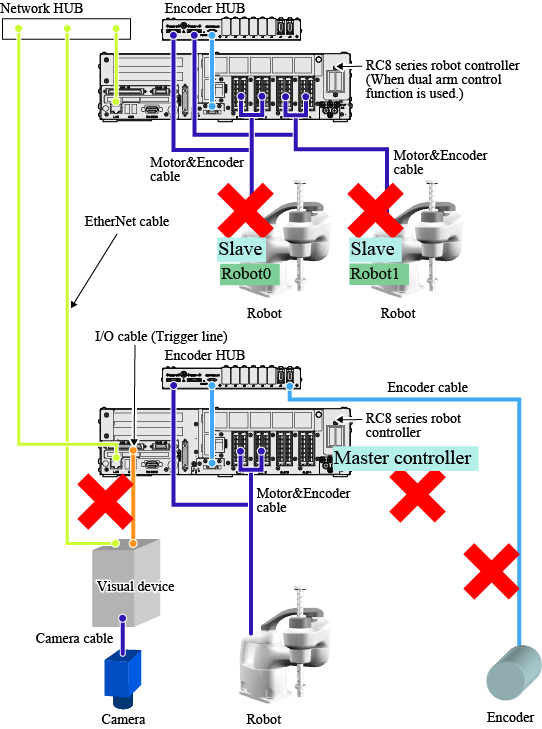
Add a Slave
As the figure above shows, in the conveyor tracking operation, if both Robot0 and Robot1 are set as master, you cannot add respective robot controllers for each master. You can add a slave robot only to either of the master robots.
Three or More Robots Share a Single Conveyor
If three or more robots share one conveyor, the master can be assigned to a robot which is controlled by the dual arm control function-used robot controller. You cannot specify a robot controller which does not use the dual arm control function as a master.
ID : 3410