
ID : 2848
Setup Procedure
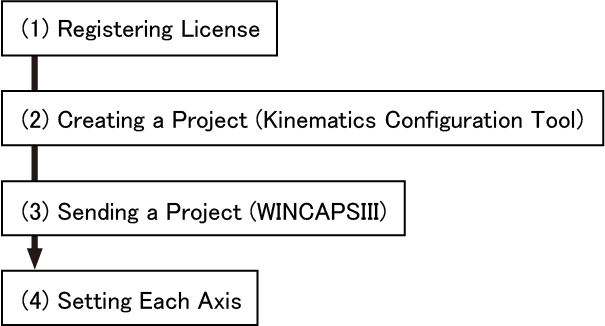
It is possible to do "(4) Setting Each Axis" before doing "(2) Creating a Project".
In that case, after "Setting Each Axis", select "Editing an Existing Project" at the step of Kinematics Configuration Tool.
(1) Registering License
This function requires a license key for each controller since this is an option function.
To enter a license key, use a teach pendant.
For how to enter it, refer to “Registering License” in OPTION.
Kinematics configuration of the robot type X, XY, XYZ, XYZT is equipped as standard function of MC8 series. Therefore, this function is available without a license.
If you don't have the license, Kinematics configuration of X, XY, XYZ, XYZT is automatically set according to the number of robot joints selected in Configuring Robot Joints (For example, if you select 4 joints as the robot axis range, Kinematics configuration of XYZT is internally set).
(2) Creating a Project (Kinematics Configuration Tool)
Create a project with Kinematics Configuration Tool.
(3) Sending a Project (WINCAPSIII)
Send a project to a controller with WINCAPSIII.
(4) Setting Each Axis
Set each axis respectively to operate a robot.
Complete all the steps of "Start-up procedure of the extended-joint (ball screw)" in "EXTENDED-JOINT MANUAL".
In addition, if you use a parallel link robot, you need to set parameters for some items. For details, refer to the "Additional Setting Parameters of Parallel Link Robot".
For setting the arm parameters, refer to "Arm Parameter Settings" in "MC8 SERIES (MOTION CONTROLLER) MANUAL".
When setting the gain parameter in the control system, if the conditions of conduct on auto gain tuning are not met, perform manual gain tuning.
For derails, refer to "Auto Gain Tuning Procedure", "Manual Gain Tuning" in EXTENDED-JOINT MANUAL.
ID : 2848