
ID : 3973
Connection between Camera and COBOTTA
This section describes how to connect hardware.
Connection of Hardware
For AF Camera (N10-W02)
An AF camera (N10-W02) can be connected in the following two ways:
- Connection method to use a AF camera (N10-W02) on the tip of the arm
- Connection method to use a AF camera (N10-W02) at other positions than the tip of the arm
In either of the connection methods, power must be supplied from the PoE Hub or PoE Injector to the AF camera (N10-W02).
Make COBOTTA Recognize AF Camera (N10-W02)
To make COBOTTA recognize an AF camera (N10-W02) automatically, before you turn on COBOTTA, turn on the power supply to AF camera (N10-W02). If COBOTTA has been started when AF camera (N10-W02) starts, COBOTTA cannot recognize the camera automatically.
When AF camera (N10-W02) cannot be recognized automatically for any reason (such as COBOTTA has been started), make COBOTTA recognize AF camera (N10-W02) manually. The following describes the operation procedures.
- In the Built-in vision menu, press [F6 Disconnect], close the Built-in vision function.
- [F6 Disconnect] is changed to [F6 Connect]. Press [F6 Connect] to make COBOTTA recognize AF camera (N10-W02).
For details, refer to "Displaying and Operating the Built-in Vision".
Connection Method to Use AF Camera (N10-W02) on Tip of Arm
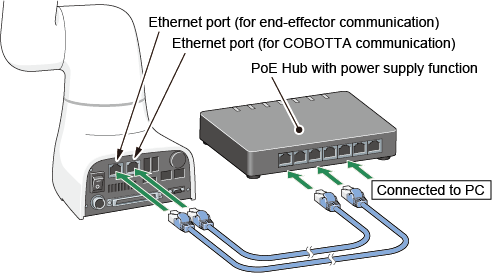
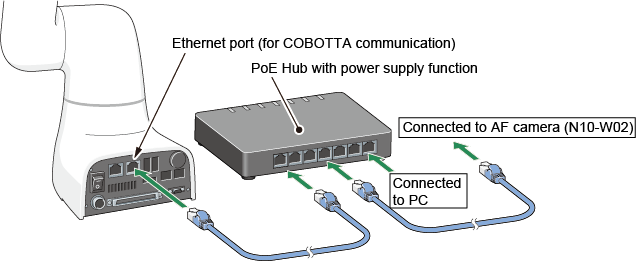
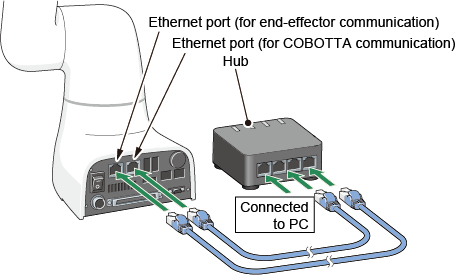
Connect the AF camera (N10-W02) to the end-effector connector.A signal is output from the "Ethernet port (for end-effector communication)" via the internal wiring. For setup, connect the camera via the PoE Hub or a Hub (not PoE type) and the PoE Injector to the "Ethernet port (for COBOTTA communication)."
When the PoE Hub is used, it can be used also during camera use.
For setup |
During camera use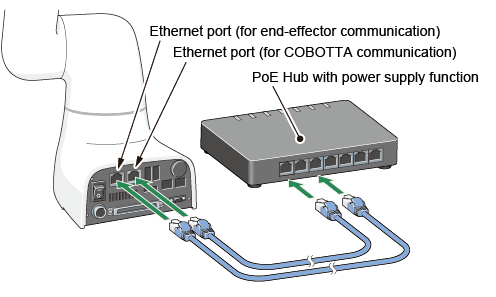 |
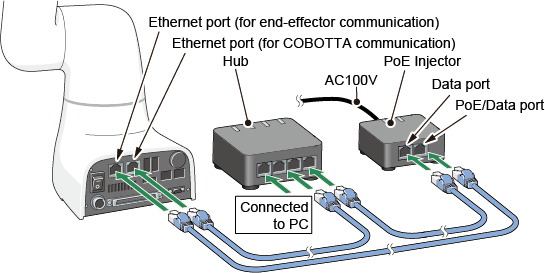
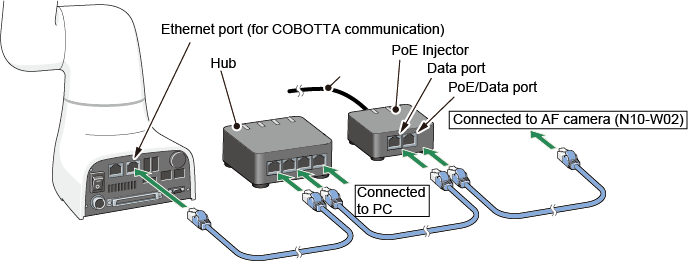
When a Hub and the PoE Injector are used, remove the Hub and connect the camera via the PoE Injector during camera use.
For setup |
During camera use |
Connection Method to Use AF Camera (N10-W02) at Other Positions than Tip of Arm
For setup, connect the camera via the PoE Hub or a Hub (not PoE type) and the PoE Injector to the "Ethernet port (for COBOTTA communication)" of COBOTTA.
When the PoE Hub is used, it can be used also during camera use.
For setup |
During camera use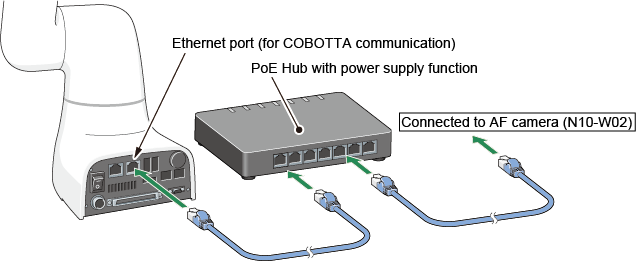 |
When a Hub and the PoE Injector are used, remove the Hub and connect the camera via the PoE Injector during camera use.
For setup |
During camera use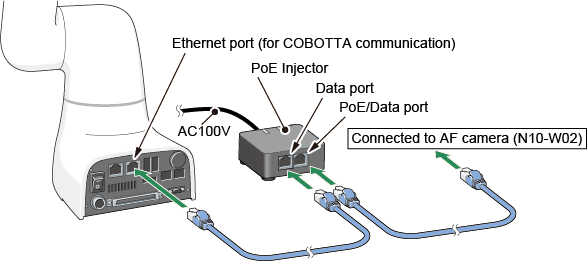 |
For GigE Camera (Basler) and Network Camera (Canon)
This connection is possible only when the GigE camera (Basler) is used on external power.If power is supplied from the LAN (PoE), the connection is the same as the AF camera (N10-W02).The network camera (Canon) can be used only on external power source.
The GigE camera (Basler) used on external power and the network camera (Canon) can be connected in the following two ways:
- Connection method to use a camera on the tip of the arm
- Connection method to use a camera at other positions than the tip of the arm
Make COBOTTA Recognize a Camera
To make COBOTTA recognize a camera automatically, before you turn on COBOTTA, turn on the power supply to the camera. If COBOTTA has been started when a camera starts, COBOTTA cannot recognize the camera automatically.
When a camera cannot be recognized automatically for any reason (such as COBOTTA has been started), make COBOTTA recognize the camera manually. The following describes the operation procedures.
- In the Built-in vision menu, press [F6 Disconnect], close the Built-in vision function.
- [F6 Disconnect] is changed to [F6 Connect]. Press [F6 Connect] to recognize a camera.
For details, refer to "Displaying and Operating the Built-in Vision".
Connection Method to Use Camera on Tip of Arm
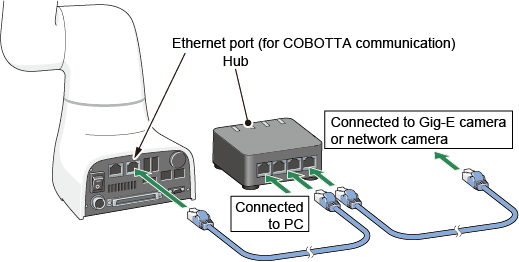
Connect the camera to the end-effector connector.A signal is output from the "Ethernet port (for end-effector communication)" via the internal wiring. Connect the camera via a Hub to the "Ethernet port (for COBOTTA communication)" for setup and connect it directly during camera use.
For setup |
During camera use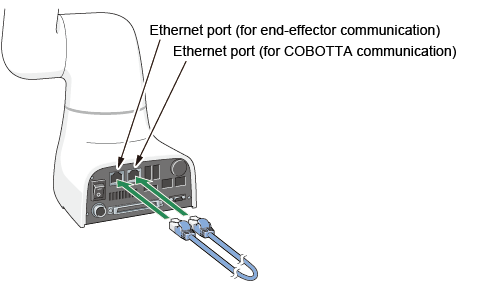 |
Connection Method to Use Camera at Other Positions than Tip of Arm
Connect the camera via a Hub to the "Ethernet port (for COBOTTA communication)" for setup and connect it directly during camera use.
For setup |
During camera use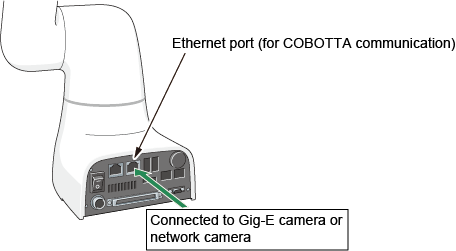 |
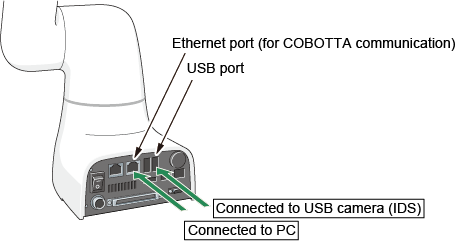
For USB Camera (IDS)
Make COBOTTA Recognize a Camera
To make COBOTTA recognize a camera automatically, before you turn on COBOTTA, connect the camera to COBOTTA. If you connect a camera to COBOTTA after the COBOTTA turning on, the camera cannot be recognized automatically.
When a camera cannot be recognized automatically for any reason (such as a camera is connected to COBOTTA after the COBOTTA turning on), make COBOTTA recognize the camera manually. The following describes the operation procedures.
- In the Built-in vision menu, press [F6 Disconnect], close the Built-in vision function.
- [F6 Disconnect] is changed to [F6 Connect]. Press [F6 Connect] to recognize a camera.
For details, refer to "Displaying and Operating the Built-in Vision".
How to Connect a Camera
Connect the USB camera to a USB connector of COBOTTA.
For setup |
During camera use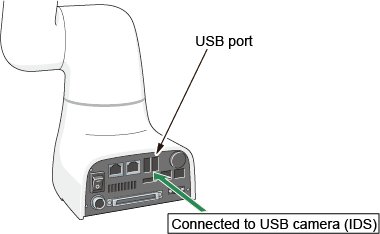 |
Preparations
Make the following preparations.
Connection and IP Address Setting of COBOTTA and Computer
Connect a computer to COBOTTA via LAN.Specify an IP address for each of the computer and COBOTTA to enable communication between them.For details about IP address setting of COBOTTA, refer to "Displaying and Changing Communication Settings Screen" in the TP App Operation Guide.
To separate the AF camera (N10-W02) and COBOTTA in different IP segments, specify an IP address for the camera first.If an IP address is specified for COBOTTA first, it cannot be connected to the camera.
For details about IP address setting of AF camera (N10-W02), refer to "AF Camera (N10-W02) Setting."
Activation of Visual Option
Visual Option need not be activated because the "DENSO Robot Imaging Library" and "EVP" licenses are valid for COBOTTA.
ID : 3973