
ID : 2368
How to Use an Electric Gripper in Cooperative Control Function
Electric grippers connected to each robot controller can be operated and/or configured from the master controller-connected teach pendant.
In programming, a robot name is used to specify an electric gripper to move.
The function mentioned above is available to a robot controller which software version is 1.13.* or higher.
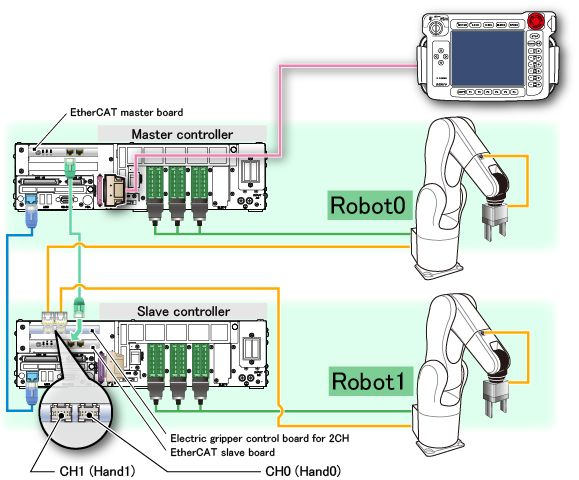
When an electric gripper is used in the cooperative control function, in some cases, an electric gripper which is wired to the robot controller of Robot1 may be attached to the tool end of Robot0.
In this case, the electric gripper-attached robot name and the robot name of the electric gripper-wired robot controller will be inconsistent.
For such application, it is not intuitive from the viewpoint of operation/configuration though, a robot controller has a feature that realizes intuitive operation/setting (robot name-electric gripper linkage function).
The function mentioned above is available to the robot controller which software version is 2.5.* or higher.
Operaiton and Configuration
Basically, electric grippers can be controlled and configured from the master controller. However, only the license registration needs to be done with slave controllers.
License Registration
When using electric grippers in cooperative control function, you need to register licenses for each controller that use an electric gripper.
Connect a teach pendant or mini pendant to a slave controller, and then register a license.
Designate a Setting-Target Robot as Leader Robot
Basically, any operation and configuration with the master controller-connected teach pendant works on the robot which is assigned as a leader.
Therefore, to control or configure a slave controller-connected electric gripper, assign a robot connected to the slave controller as a leader.
The following is a sample window image when two robots are linked for cooperation.
To set Robot1 as a leader robot, from the [Robot selection] button on the top of the window, select [R1] and then press [OK].
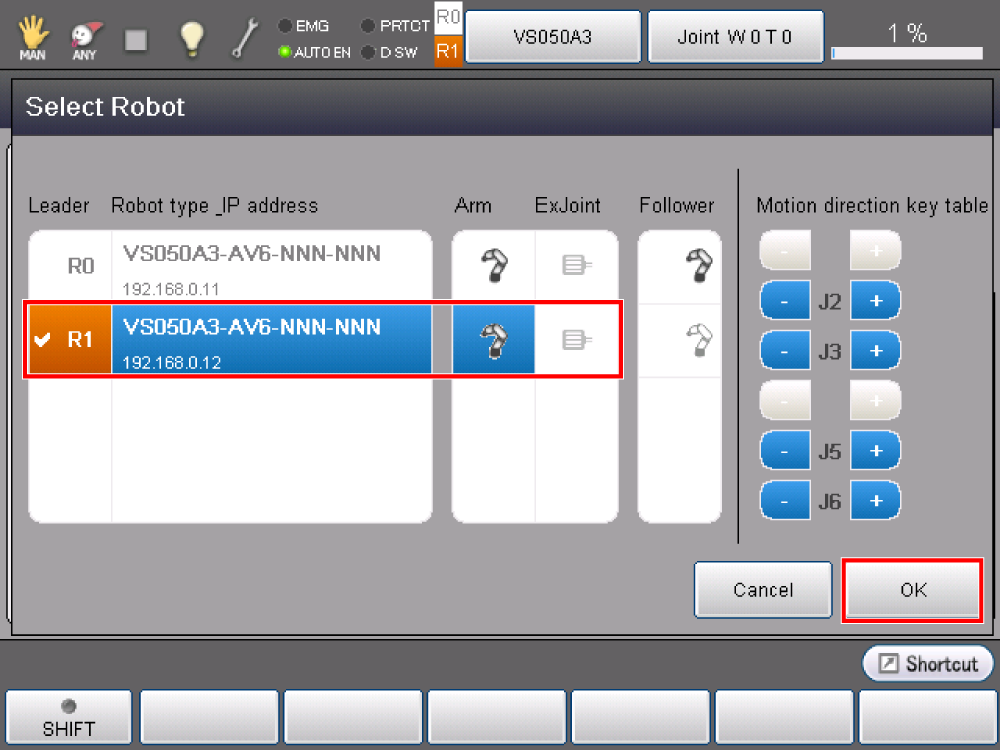
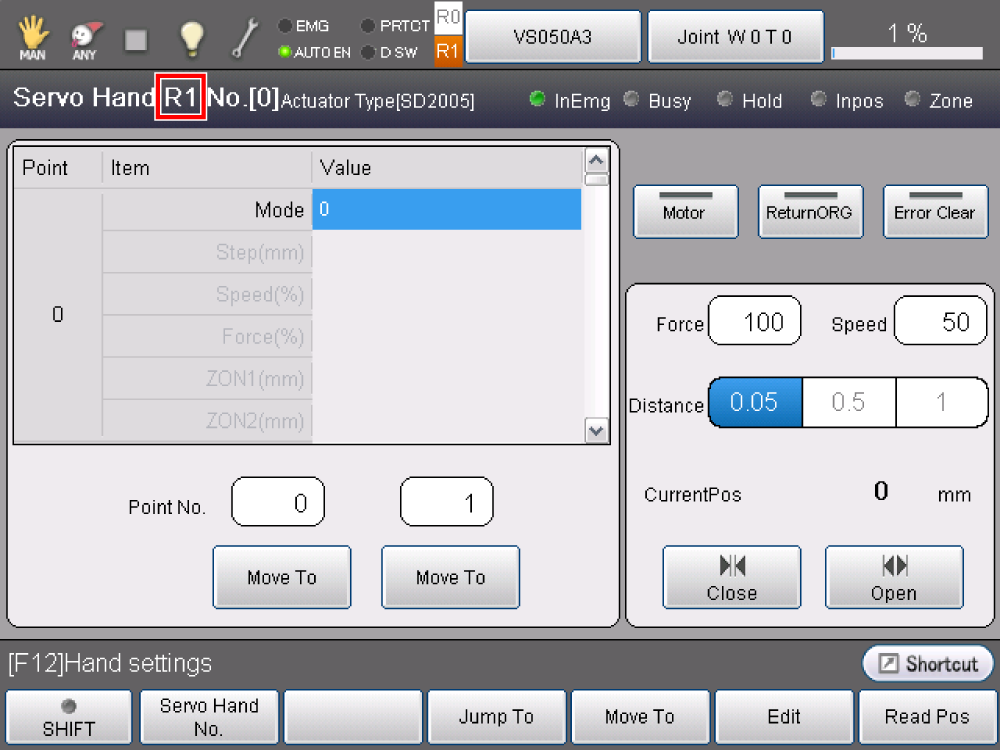
From the top menu, press [F9:Hand] to display Hand window of the leader robot. On the top of the window, you will see the robot number of the leader robot.
Linkage between Robot Names and Electric Grippers
This function is available to the robot controller which software version is 2.5.* or higher.
When an electric gripper is used in the cooperative control function, in some cases, an electric gripper which is wired to the robot controller of Robot1 may be attached to the tool end of Robot0, as the following figure shows.
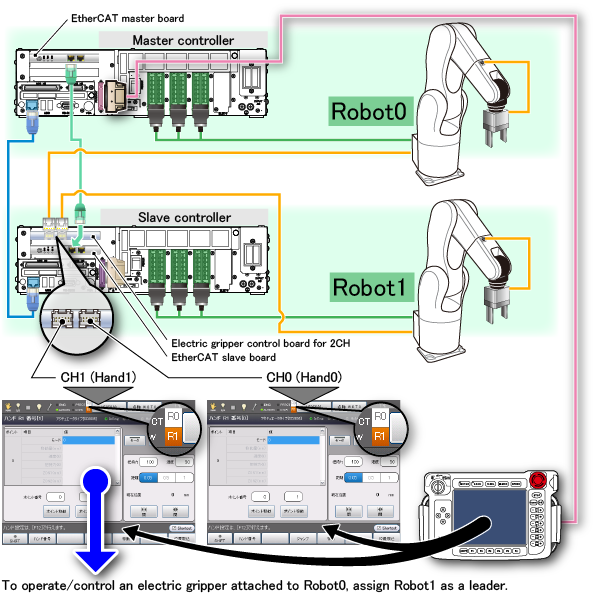
In this case, the electric gripper control board is installed in the robot controller of Robot1. Therefore, to control/configure an electric gripper of Robot0, assign Robot1 as a leader.
Above-mentioned application is not intuitive from the viewpoint of operation/configuration though, a robot controller has a "SelectHand" function that realizes intuitive operation.
SelectHand is a command written in PacScript to control an electric gripper. There are necessary configuration before use.
Setting parameters are located in VRC setting.
Before operation, set the user level to "Maintainer".
| Operation path : [F6 Setting]-[F2 System info]-[F6 VRC Setting] |
By following the above operation path, VRC Setting window will appear.
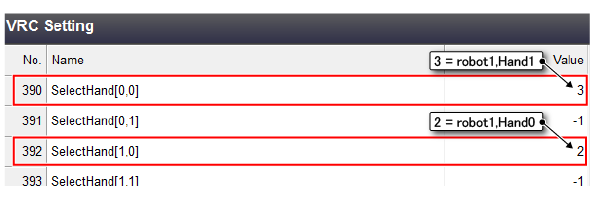
No.390 to 397 are the setting parameters of SelectHand. Select one of them and then press [F5: Edit] to display the following window.
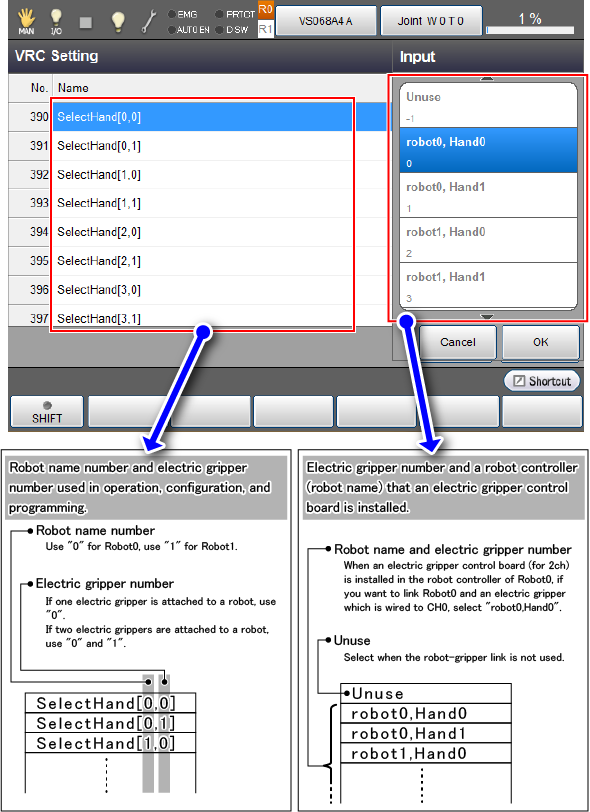
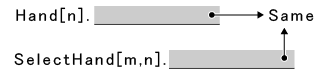
SelectHand has array structure. For the meaning of each element, see the figure above.
The figure above shows how to specify the control-target electric gripper when SelectHand[0,0] is used.
Suppose that you create the following system structure.
When parameters in VRC setting are entered as the following image shows, if "SelectHand[0,0]" is used, an electric gripper attached to Robot0 is controlled.
Also, if "SelectHand[1,0]" is used, an electric gripper attached to Robot1 is controlled. This realizes the intuitive programming.
This logic is applied not only to PacScript-used programming but also teach pendant-used robot operation/configuration (For example, an electric gripper attached to Robot0 can be operated/controlled by setting Robot0 as a leader robot).
Except for the robot name and electric gripper link function, functions of SelectHand command and Hand command are the same. For details, refer to "Command" in the following content.
Setting of the Electric Gripper
Perform STEP 3 to 8 of Settings of the Electric Gripper.
Command
Electric grippers can be used by SelectHand command or by specifying a robot name.
Using SelectHand Command
This function is available to the robot controller which software version is 2.5.* or higher.
SelectHand command controls an electric gripper which has been linked with a robot name (For information about the electric gripper-robot name link, refer to "Linkage between robot names and electric grippers").
Except for the robot name and electric gripper link function, functions of SelectHand command and Hand command are the same.
Also, the syntax is the same as the string which is followed by the "Hand[n]" of Hand command (Refer to the following image).
For example, to turn on the motor of electric gripper which is linked with SelectHand[0,0], write as follows.
SelectHand[0,0].Motor On
Using a Robot Name
Write the robot name of an electric gripper control board-installed robot controller in front of the Hand command.
Note that the setting of "SelectHand" is not reflected.
The following is a sample program that uses robot names for Hand command.
Example
'!TITLE "Motion of the Electric gripper"
Sub Main

  TakeArm Keep = 0
  Motor On

  If Robot0.Hand[0].MotorState = False Then
    Robot0.Hand[0].Motor On
  End If

  If Robot1.Hand[0].MotorState = False Then
    Robot1.Hand[0].Motor On
  End If

  If Robot0.Hand[0].OrgState = False Then
    Robot0.Hand[0].Org
  End If

  If Robot1.Hand[0].OrgState = False Then
    Robot1.Hand[0].Org
  End If

  'Gripping motion of Robot0
  Robot0.Move P, @0 P0
  Robot0.Depart L, @E -50, S = 20
  Robot0.Hand[0].Chuck 0
  Wait Robot0.Hand[0].HoldState = -1
  Robot0.Depart L, @E 20, S = 20
  Robot0.Depart L, @E -20, S = 20
  Robot0.Hand[0].Unchuck 1
  Robot0.Depart L, @E 50, S = 20
  Move P, @0 P1

  'Gripping motion of Robot1
  Robot1.Move P, @0 P2
  Robot1.Depart L, @E -50, S = 20
  Robot1.Hand[0].Chuck 0
  Wait Robot1.Hand[0].HoldState = -1
  Robot1.Depart L, @E 20, S = 20
  Robot1.Depart L, @E -20, S = 20
  Robot1.Hand[0].Unchuck 1
  Robot1.Depart L, @E 50, S = 20
  Robot1.Move P, @0 P1

  'Simultaneous gripping motion of Robot0 and Robot1
  Robot0.Hand[0].MoveH 50, 80, Next
  Robot1.Hand[0].MoveH 50, 80
  Delay( 500 )
  Move P, @0 P1,SyncTime = Robot1
  Robot0.Hand[0].MoveA 0, 80, Next
  Robot1.Hand[0].MoveA 0, 80
  Robot0.Move P, @0 P0, SyncTime = Robot1

End Sub
ID : 2368