
ID : 2284
Controller Setup for Exclusive Control Using Cooperative Control
To use the exclusive control and the cooperative control together, set the master controller of the cooperative control as a master controller of the exclusive control.
To use both the cooperative control function and the exclusive control function together, the software version of robot controllers must be 2.0.* or higher for each.
Procedure
After setting the exclusive control, set the cooperative control.
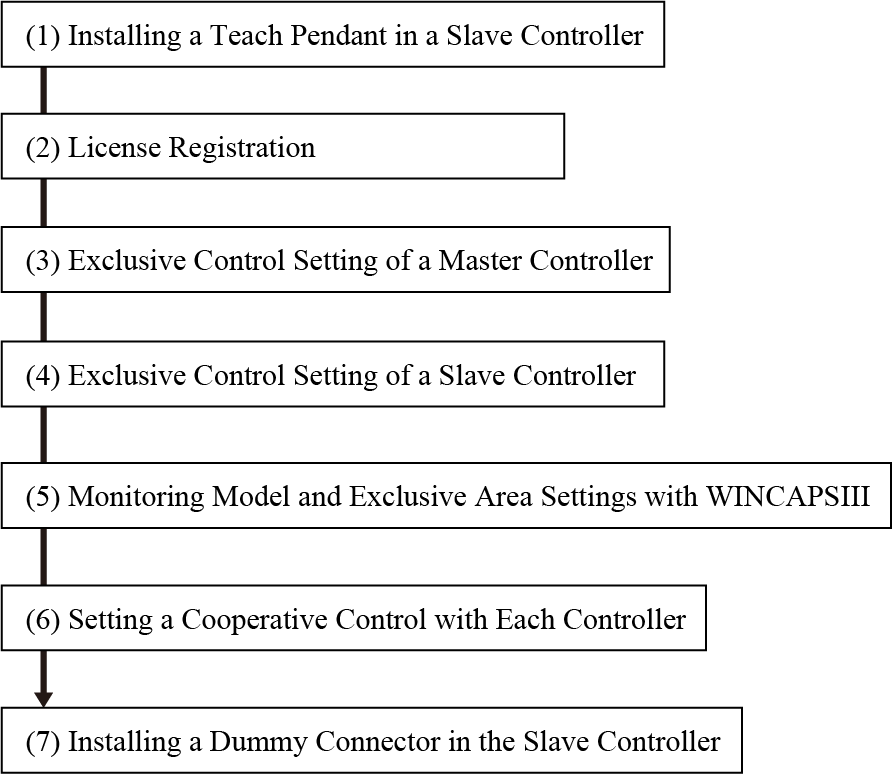
(1) Installing a Teach Pendant in a Slave Controller
Turn the slave controller power switch off.
Disconnect a dummy connector connected, connect a teach pendant and turn the slave controller power switch on. If an error occurs, release it.
(2) License Registration
Register licenses of Exclusive control and Cooperative control in each controller. Master/slave controller must be registered respectively.
For how to enter them, refer to “Registering License” in OPTION.
This operation is not required if a license has been registered already.
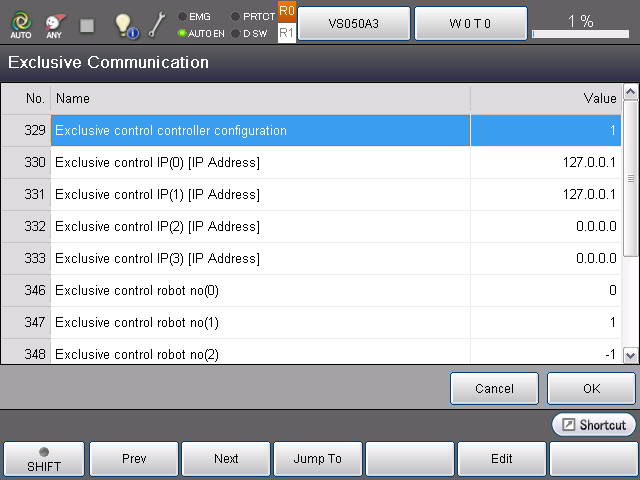
(3) Exclusive Control Setting of a Master Controller
Perform exclusive control setting with a master controller.
Operation path: Basic window - [F2 Arm] - [F6 Aux] - [F11 Exclusive Control] - [F2 Exclusive Comunication]
Set each parameter along with the following instructions.
| No. | Item Name | Description | |
|---|---|---|---|
| 329 | Exclusive control controller configuration | Select "1 : Master controller". | |
| 330 | Exclusive control IP(0) [IP Address] | Setting for Robot0 | For each robot, specify whether to include the robot in the exclusive group.
|
| 331 | Exclusive control IP(1) [IP Address] | Setting for Robot1 | |
| 332 | Exclusive control IP(2) [IP Address] | Setting for Robot2 | |
| 333 | Exclusive control IP(3) [IP Address] | Setting for Robot3 | |
| 346 | Exclusive control robot no(0) | Setting for Robot0 | Specify the robot name to link in the cooperative control function. For robots that you don't want to link with, enter "-1".
|
| 347 | Exclusive control robot no(1) | Setting for Robot1 | |
| 348 | Exclusive control robot no(2) | Setting for Robot2 | |
| 349 | Exclusive control robot no(3) | Setting for Robot3 | |
For details about parameter, refer to VRC in PARAMETER LIST.
 z
z
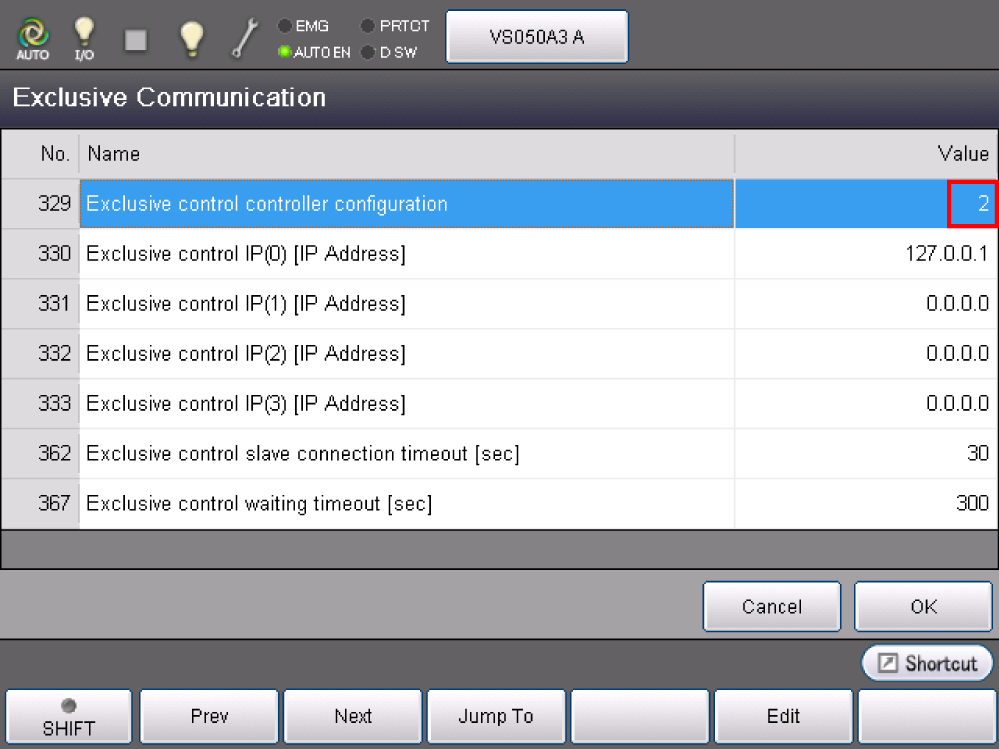
(4) Exclusive Control Setting of a Slave Controller
Perform exclusive control setting with a slave controller.
Operation path: [F2 Arm] - [F6 Aux] - [F11 Exclusive Control] - [F2 Exclusive Communication]
Set the following parameter to the specified value.
| No. | Item Name | Value | Description |
|---|---|---|---|
| 329 | Exclusive control controller configuration | 2 | Use this controller as a slave controller |
(5) Monitoring Model and Exclusive Area Settings with WINCAPSIII
Create monitoring models and exclusive areas for both the master controller project and slave controller project. Once models and areas are created, connect a computer for each controller and then send the created data.
For details about communication method, refer to "Cooperative Control Dual Arm Tool" in COOPERATIVE CONTROL FUNCTION GUIDE.
(6) Setting a Cooperative Control with Each Controller
For information how to set a cooperative control, refer to the "Setup Procedure" in COOPERATIVE CONTROL FUNCTION GUIDE.
(7) Installing a Dummy Connector in the Slave Controller
Turn off the master and slave controllers.
Disconnect a teach pendant from the slave controller, and then connect a dummy connector. Once the dummy connector is connected, turn on the master and slave cooperative controller power switch simultaneously. Exclusive control and cooperative control will be enabled after rebooting.
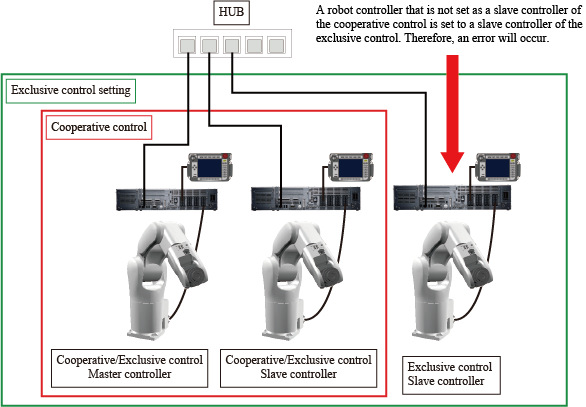
Precautions for System Configuration
Robot Controller Available for Master Controller of the Exclusive Control
Robot controller available for the master controller of the exclusive control is only the master controller of the cooperative control.
Robot Controller Available for Slave Controller of the Exclusive Control
Robot controller available for the slave controller of the exclusive control is only the slave controller of the cooperative control.
For example, if you set each robot controllers as shown in the figure below, a robot controller on the right will issue an error.
Precautions for Using Cooperative Control Command
Applicable precautions differ depending on the robot controller's software version.
For Software Version from 2.0.* to 2.3.*.
Before starting the synchronous motion (robot motion using "SyncTime" command) or the cooperative motion (robot motion using "SyncMove" command), you need to disable the exclusive area by means of "ResetExclusiveArea" command.
For Software Version 2.5.* or Higher.
The Synchronous motion (robot motion using "SyncTime" command) and the cooperative motion (robot motion using "SyncMove" command) can be used under the exclusive area-enabled state.
However, once the multiple robots enter the exclusive area as a result of the synchronous motion or the cooperative motion, the robots can only perform the synchronous motion or the cooperative motion, unless the robots leave the exclusive area.
Oppositely, once the multiple robots enter the exclusive area as a result of robot motion other than the synchronous motion or the cooperative motion, the robots can only perform the robot motion other than the synchronous motion or the cooperative motion, unless the robots leave the exclusive area.
The following shows the case study for exclusive area entry by different robot motions.
Robots Enter the Exclusive Area with Synchronous Motion or Cooperative Motion
- Motion at the exclusive area entry
-
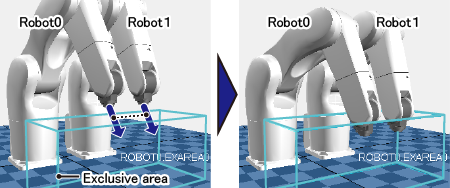
Let Robot0 and Robot1 enter the exclusive area with the synchronous motion or the cooperative motion.
(This include the case when only one robot enters the exclusive area).
- Motion after the entry
-
Motions available 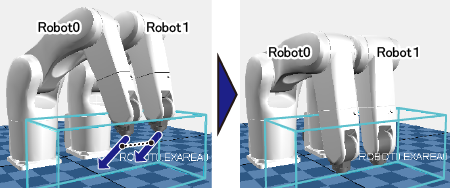
To let Robot0 and Robot1 perform the synchronous motion or the cooperative motion.
This application allows multiple robots running in the exclusive area. Pay attention not to collide robots (especially when in the synchronous motion).
To move Robot0 and Robot1 out of the exclusive area with the synchronous motion or cooperative motion, and then run each robot individually. (In the above figure, Robot0 runs solely).
Motions not available 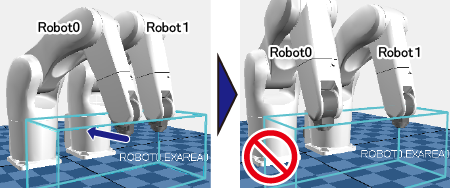
To run a robot solely (In the above figure, Robot0 runs solely).
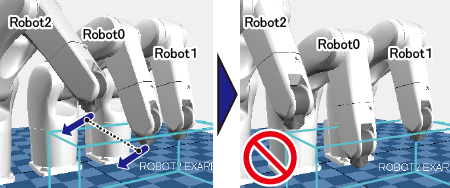
To let a robot perform the synchronous motion or the cooperative motion with other robot (In the above figure, Robot0 and Robot2 perform the synchronous motion or the cooperative motion).
In the figure above, the synchronous motion or the cooperative motion between Robot0 and Robot2 is impossible, since Robot0 has been linked with Robot1 (Impossible to add a robot in the predetermined robot link).
Also, the synchronous motion or the cooperative motion with only two robots (Robot0 and Robot1) is impossible, since Robot0 has been linked with Robot1 and Robot2 (Impossible to reduce a robot from the predetermined robot link).
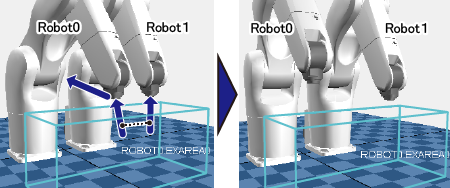
Robots Enter the Exclusive Area with other than Synchronous Motion or Cooperative Motion
- Motion at the exclusive area entry
-
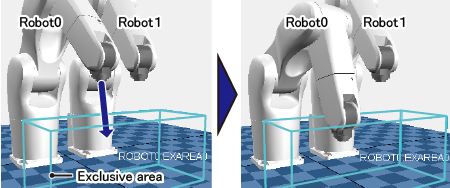
Let Robot0 enter the exclusive area solely.
- Motion after the entry
-
Motions available 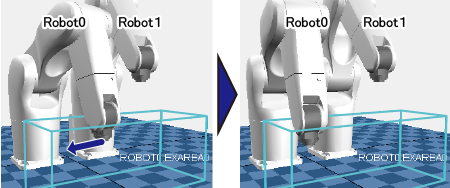
To let Robot0 runs solely.
At first, to let Robot0 exits from the exclusive area solely, and then let Robot0 perform the synchronous motion or the cooperative motion with other robot (In the above figure, Robot0 and Robot1 perform the synchronous motion or the cooperative motion).
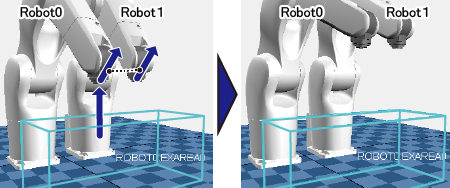
Motions not available 
To let a robot perform the synchronous motion or the cooperative motion with other robot (In the above figure, Robot0 and Robot1 perform the synchronous motion or the cooperative motion).
ID : 2284