
ID : 4113
Displaying and Operation of I/O
Operation path : Top window - [F4 I/O]
Display and set I/O monitor.
Press [F4 I/O] to display the following [I/O monitor] window.
When you turn the I/O on or off, the output signal of the robot also turns on or off.
Before operation, make sure that changing I/O state will not cause the serious injury or damages for personnel and devices.
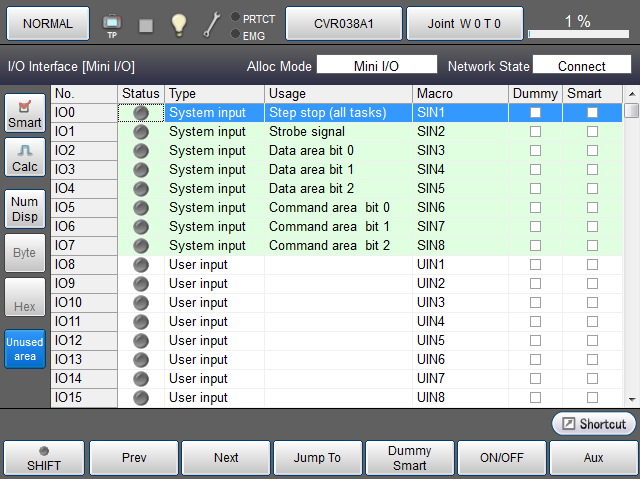
| Keys other than function keys | |
|---|---|
| [Smart] | Display I/O number whose check box for "Smart" is checked. |
| [Calc] | Perform I/O bit calculation. |
| [NumDisp] |
Perform I/O bit calculation. When pressing the [NumDisp] button, this function is enabled and button turns blue color. When this [NumDisp] button is enabled (blue color), the [Ununsed area] button status cannot be changed. |
| [Byte] |
Switch the calculation method of I/O bit. This can be switched while the [NumDisp] button is blue. |
| [Hex] |
Display the calculation result in hex number. This can be switched while the [NumDisp] button is blue. |
| [Unusedarea] |
Display unused I/Os. When pressing the [Unused area] button, this button turns blue color and the function is enabled. This is enabled (blue color) at the default setting. When the [Unused area] button is disabled, the [NumDisp] button status cannot be changed. |
| Available function keys | |
|---|---|
| [F1 Prev] | Display the previous page of the currently displayed I/O information. |
| [F2 Next] | Display the next page of the currently displayed I/O information. |
| [F3 Jump To] | Displays ten key. Enter I/O number with ten key, and press [OK] to move to the target I/O number. The selected I/O number will be highlighted. This can be also selected by using up and down cursor keys on the Remote TP/Virtual TP |
| [F4 Dummy Smart] |
Set dummy input ON/OFF for the selected I/O number when "Dummy" is checked. Set Smart input ON/OFF for the selected I/O number when the "Smart" is checked. |
| [F5 ON/OFF] | Switch ON/OFF the selected I/O number. |
| [F6 Aux] | Display auxiliary functions menu for I/O. |
ID : 4113