
ID : 5592
Acquiring, Displaying and Saving Force Control Log
Acquire logs of the following values of each axes, and then display the result in the graph; - Command value of travel distance - Current value of travel distance - Command value of tool end - Current value of tool end - Sensor value
For adjustment procedure by using Force control log, refer to "Adjustment Procedure".
WINCAPSIII receives the force control log at the same time of the control log reception. You can output the received force control log as a CSV file. To export the log, from the menu bar of the WINCAPSIII, point to [File]-[Export].
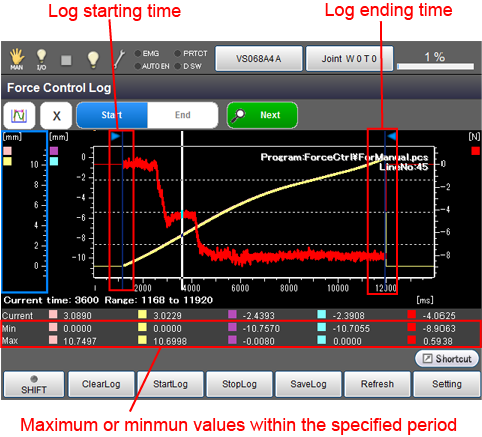
Displaying the Force Control Log
From the top screen, press [F2 Arm]-[F6 Aux]-[F1 Force Control Log]
Bold line on the graph indicates the area where the force sensor works.

Touching an icon on the upper left will displays a pull down menu that includes operation mode as shown below. There are four types of operation modes available.
| Operation mode | Description | Right/Left arrow keys or Jog dial |
UP/Down arrow keys or the combination of Up/Down arrow keys and Jog dial |
Screen touch |
|---|---|---|---|---|
 Move the display |
Shifts the display range of the graph axis. | Pressing Right/Left arrow keys will move the display range of the X axis. To adjust the display range with smaller scale, turn the jog dial. | Pressing Up/Down arrow keys will move the display range of the selected Y axis. To adjust the display range with smaller scale, turn the jog dial while pressing Up/Down arrow keys. | The display range of the X axis moves. |
 Change the scale |
Expands or contracts the display range of the graph axis. | Pressing the Right/Left arrow keys will expand or contract the display range of the X axis. To adjust display range more precisely, turn the jog dial. | Pressing the Up/Down arrow keys will expand or contract the display range of selected Y axis. To adjust the display range more precisely, turn the jog dial while pressing Up/Down arrow keys. | The display range of the X axis moves. |
 Change the range |
For details, refer to the following "Change the range" section. | Pressing the Right/Left arrow keys will move the selection range cursor on the X axis. To adjust the selection range with smaller scale, turn the jog dial. | Not used. | The selection range on the X axis moves to the position where you touched. |
 Check the current |
Value of the selected range. If you select a position where a robot motion command was executed, "Program" and "Line number" are displayed on the upper right. | Pressing the Right/Left arrow keys will move the cursor indicating the current value. To adjust the cursor more precisely, turn the jog dial. | Not used. | The cursor indicating the current value moves to the position where you touched. |
| Keys other than function keys | |
|---|---|
|
|
Pressing this button will display a pull down menu. |
| Dist-Inst |
Display the information of Dist-Inst. |
| Dist-Enc | Display the information of Dist-Enc. The graph shows the value on the force control coordinate system. Selecting this item will display a line graph with a purple line. |
| Pos-Inst |
Display the information of Pos-Inst. |
| Pos-Enc |
Display the information of Pos-Enc. |
| Sensor |
Display the information of Sensor. |

| Available function keys | |
|---|---|
| [F1 Clear Log] | Delete the acquired control log information. |
| [F2 Start Log] |
Starts acquiring control log. REC on the icon of force control log tab turns on when the acquisition of control log is started. |
| [F3 Stop Log] |
Stops acquiring control log. REC on the icon of force control log tab turns off when the acquisition of control log is completed. |
| [F4 Save Log] | Saves the acquired control log information. |
| [F5 Refresh] | Updates the latest information on theforce control log display screen of tech pendant |
| [F6 Setting] |
Displays [Force Control log settings] window. Confirm and change the Force control log-related settings. |
| [F7 Switch Y-Value display] |
Changes the display of Y-axis scale between vertical and horizontal. Setting the Y-axis scale to the vertical direction will expand the display range of the graph. |
| [F8 Change axis display range] |
Changes the display range of the X- or Y-axis. Pressing [F8 Change axis display range] will display the setting window. Select desired operation from the followings.
|
Change The Range
| keys | Function |
|---|---|
| Start |
Set the starting time of logs. Once the button is pressed, the green lamp turns on so that you can set the log starting time. |
| End |
Set the ending time of logs. Once the button is pressed, the green lamp turns on so that you can set the log ending time. |
| Next | Jump to the beginning of the next force control period. |
Sample Program
Start the log acquisition before starting the force control. End the log acquisition when the force control ends.
Sub Main

  TakeArm Keep = 0

  Motor On

  'Initial position
  Move L, P4+(0,0,10)

  SysLog.Ctrl.Clear
  SysLog.Ctrl.Start

  'Set the current values to zero. (0N|0Nm)
  ForceSensor 0

  Delay 1000

  'Enable the impedance control with the setting of the table number 1
  ForceParam 1,1,P(0,0,30,0,0,0),Damp = P(100,100,100,100,100,100),SPMax = 100

  'Start the force control
  ForceCtrl True, 1

  'Wait until the conditions are meet
  ForceWaitCondition Force = P(0,0,5)

  'Actively change the control parameters
  ForceParam 1,1,P(0,0,10,0,0,0), Damp = P(100,100,100,100,100,100), SPMax = 100

  'Rotate around the Rz-axis
  Drive (6,45), Speed = 20, Next

  Delay 10000

  'End the force control
  ForceCtrl False

  'End the motion
  Move P, P4+(0,0,10)

  SysLog.Ctrl.Stop

End Sub
ID : 5592
- Related Information
- Displaying and Changing the Force Control Log Setting