
ID : 4086
How to Display and Set Areas
Operation path : [F2 Arm] - [F6 Aux] - [F5 Area]
Define area.
The maximum of 32 area can be registered.
They are used to set the area for interference check between robot and other equipments.
Press [F5 Area] to display the following [Define Area] window.
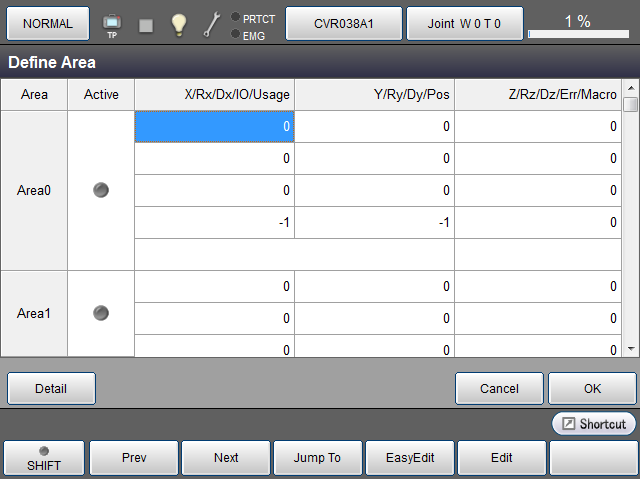
In Define Area window, you can set the following items. Select a cell that you intend to set, and then press [F5 Edit]. (Except for [Active])
| Cell | Description |
|---|---|
| Active | Switch the area function status to Active or Inactive. The indicator color shows the status of the area function; Gray : Inactivated Green: Activated When any cell is pressed, a dialog box to change the status is displayed. Pressing [OK] button on the dialog box switches the status. To keep current condition, press [Cancel] button. |
| X, Y, Z, Rx, Ry, Rz | Designate the position and rotation (inclination) of the center point of area. This corresponds to the center of the Area command. |
| DX, Dy, Dz | Designate the size of area. Enter an each element of vector from the center of the area to the maximum point. This corresponds to the size of the Area command. |
| IO | Designate an I/O port number to output signal at the time of detection. Designate "-1" when no I/O output is performed. You cannot designate any non-existing port number or I/O port number that cannot output signals. This corresponds to the I/O number of the Area command. |
| Pos | Designate an index number of Position Type global variable to store the detection position. Designate "-1" when no detection position is stored. This corresponds to the storage variable number of the Area command. |
| Err | Designate a detection method and error output. Pressing [F5 Edit] displays a dialog box. Select a value and then press [OK] to confirm. For details about selection, see "Interpreting a Detected Area Interference as an Error". This corresponds to the error detection setting of the Area command. |
| Keys other than function keys | |
|---|---|
| [Detail] |
Display [Area Detail setting] window. |
| Available function keys | |
|---|---|
| [F1 Prev] | Move to the previous page of the currently displayed area. |
| [F2 Next] | Move to the next page of the currently displayed area. |
| [F3 Jump To] |
Display numeric keypad. Enter the area number to select with numeric keypad, and press [OK] to select the area of the specified number. |
| [F4 Easy Edit] | Set area by specifying the position coordinates (P type variable) that are registered through teaching with one work coordinate and two robot locations. |
| [F5 Edit] |
Select the area number and coordinate element to change, and press [Edit] to display numeric keypad. |
| [F7 Detail] |
Display [Area Detail setting] window. Perform the settings associated with detection of area. |
ID : 4086